# Application Saheb Development Plan

[![Screenshot 2026-01-01 at 14.04.11.png](https://italiano.embouzkoura.space/uploads/images/gallery/2026-01/scaled-1680-/screenshot-2026-01-01-at-14-04-11.png)](https://italiano.embouzkoura.space/uploads/images/gallery/2026-01/screenshot-2026-01-01-at-14-04-11.png)

## Purpose of This Documentation

This presentation explains the design and technical decisions behind our application features.

---

### I will be covering:

---

#### 1. Technology Stack

- Backend framework
- Web frontend framework
- Mobile frontend framework
- Database technology (PostgreSQL, MySQL, etc.)
- UI libraries
- Supporting libraries and tools (date manipulation library, state management, datafetching, utilities)

---

#### 2. Project Structure

- Backend folder structure
- Frontend folder structure
- Mobile folder structure

---

#### 3. Language Support

- Multi-language database translation strategy
- App language and RTL (Right-to-Left) support on web and mobile

---

#### 4. Core Domain Logic

- Qibla calculation logic
- Prayer time calculation methods
- Hijri time caulculation methods

---

#### 5. Media Management

- Audio resource handling (Sermon / موعظة)
- Video hosting and streaming strategy

---

#### 6. Notifications &amp; Communication

- Scheduling notificaiton
- Timezone-aware push notification system
- Email notification

---

#### 7. Application Standards

- Authentication and Authorization
- Request logging
- User event and activity tracking
- API versioning
- File Upload handling
- Data Validation

---

### How Each Section Is Documented

For every section in this documentation, I consistently answer the following questions:

- What solution did I choose?
- Why did I choose this solution?
- I may cover what are the pros and cons of the solution for critical sections?
- What alternative approaches I considered?
- We may also answer questions related to a specific question

---

## 1. Technology Stack

### a. Backend Framework

---

**What solution did I choose?**  
I chose Nodejs + Expressjs + NestJS as the backend framework.

---

**Why did I choose this solution?**

- Team is more experienced with
- Widely used on our code base
- Built with TypeScript by default

---

**Pros**

- <p class="callout success">Clear module-based architecture</p>
- <p class="callout success">Strong TypeScript support  
    </p>
- <p class="callout success">Easy integration with databases, authentication, and queues</p>
- <p class="callout success">Express Rich community</p>
- <p class="callout success">Supports modular development and scalability</p>
- <p class="callout success">Fits well for APIs serving web and mobile apps</p>
- <p class="callout success">One backend server for both mobile and web</p>

---

**Cons**

- <p class="callout danger">Slightly more boilerplate</p>
- <p class="callout danger">Integration Complexity with Some Legacy Libraries</p>

---

**Alternative Approaches**

- <p class="callout info">Express.js</p>
- <p class="callout info">Fastify</p>
- <p class="callout info">Laravel (PHP)</p>
- <p class="callout info">Spring Boot (Java)</p>

---

### b. Web Frontend Framework

---

**What solution did I choose?**  
I chose **Next.js** using the **App Directory**.

---

**Why did I choose this solution?**

- Built-in support for modern React features
- File-based routing with the App Directory
- Good integration with backend APIs
- Built-in layouts, and loading states, server errors handlings

---

**Pros**

- <p class="callout success">Clear and scalable project structure</p>
- <p class="callout success">Server-side rendering and static generation</p>
- <p class="callout success">Strong support for SEO and web performance</p>
- <p class="callout success">Server Components</p>

---

**Cons**

- <p class="callout danger">Some ecosystem libraries are still adapting</p>
- <p class="callout danger">Build &amp; Deployment Complexity</p>
- <p class="callout danger">Rapidly Changing Features</p>

---

**Alternative Approaches**

- <p class="callout info">React ( Vite )</p>
- <p class="callout info">React (Tanstack start )</p>
- <p class="callout info">Nuxt.js</p>
- <p class="callout info">Angular</p>

### c. Mobile Frontend Framework

---

**What solution did I choose?**  
I chose **React Native** with **Expo**.

---

**Why did I choose this solution?**

- Allows building **iOS Android apps and web from a single codebase**
- Quick testing on simulators, emulators, and real devices
- Built-in support for **push notifications, sensors, and device APIs**
- Large community and ecosystem
- Deployment built-in (EAS Hosting)
- Routing and Authentification built in
- Assets management
- AI intergration (expo mcp server)

---

**Cons**

- <p class="callout danger">Some native modules require **custom development (Ejecting from Expo)**</p>

---

**Alternative Approaches**

- <p class="callout info">Pure React Native (without Expo)</p>
- <p class="callout info">Flutter</p>
- <p class="callout info">Native iOS (Swift) / Android (Kotlin) development  
    </p>

### d. Database Technology

---

**What solution did I choose?**  
I chose **PostgreSQL** as the database for our application.

---

**Why did I choose this solution?**

- Team is more experienced with
- Good ecosystem and tooling support
- Reliable and **stable relational database**
- Widely used in the industry with **large community and resources**
- Works well with **TypeORM** for Nestjs integration

---

**Pros**

- <p class="callout success">Open-source and actively maintained</p>
- <p class="callout success">Supports **advanced features** like JSON, full-text search, and indexes  
    </p>

---

**Cons**

- <p class="callout danger">Can be more complex to set up than simpler databases (like SQLite)</p>
- <p class="callout danger">Overkill for very small projects  
    </p>

### e. UI Libraries

---

#### **1. Web Frontend UI Approach**

**What solution did I choose?**  
I chose **shadcn/ui** integrated with **Tailwind CSS**, and **Figma designs** for reference.

---

**Why did I choose this solution?**

- Tailwind provide **CSS utility classes** to speed up development, so instead of writing custom CSS files, I can style components directly using small, reusable classes 
    - **Without Tailwind (Traditional CSS):**  
        
        - ```html
            <button class="btn">
              Save
            </button>
            ```
        - ```css
            .btn {
              background-color: blue;
              color: white;
              padding: 8px 16px;
              border-radius: 6px;
            }
            ```
    - With Tailwind: 
        - ```
            <button class="bg-blue-600 text-white px-4 py-2 rounded-md">
              Save
            </button>
            
            ```
- Provides a **ready-to-use component library** built on Tailwind CSS

[![image.png](https://italiano.embouzkoura.space/uploads/images/gallery/2026-01/scaled-1680-/image.png)](https://italiano.embouzkoura.space/uploads/images/gallery/2026-01/image.png)

[![image.png](https://italiano.embouzkoura.space/uploads/images/gallery/2026-01/scaled-1680-/cu2image.png)](https://italiano.embouzkoura.space/uploads/images/gallery/2026-01/cu2image.png)

- **Open Code:** The top layer of your component code is open for modification: 
    - Other UI libraries: 
        - ```typescript
            import Button from '@mui/material/Button';
            <Button variant="contained">Contained</Button>
            ```
    - Shadcn: 
        - ```typescript
            import * as React from "react"
            import { Slot } from "@radix-ui/react-slot"
            import { cva, type VariantProps } from "class-variance-authority"
            
            import { cn } from "@/lib/utils"
            
            const buttonVariants = cva(
              "inline-flex items-center justify-center gap-2 whitespace-nowrap rounded-md text-sm font-medium transition-all disabled:pointer-events-none disabled:opacity-50 [&_svg]:pointer-events-none [&_svg:not([class*='size-'])]:size-4 shrink-0 [&_svg]:shrink-0 outline-none focus-visible:border-ring focus-visible:ring-ring/50 focus-visible:ring-[3px] aria-invalid:ring-destructive/20 dark:aria-invalid:ring-destructive/40 aria-invalid:border-destructive",
              {
                variants: {
                  variant: {
                    default: "bg-primary text-primary-foreground hover:bg-primary/90",
                    destructive:
                      "bg-destructive text-white hover:bg-destructive/90 focus-visible:ring-destructive/20 dark:focus-visible:ring-destructive/40 dark:bg-destructive/60",
                    outline:
                      "border bg-background shadow-xs hover:bg-accent hover:text-accent-foreground dark:bg-input/30 dark:border-input dark:hover:bg-input/50",
                    secondary:
                      "bg-secondary text-secondary-foreground hover:bg-secondary/80",
                    ghost:
                      "hover:bg-accent hover:text-accent-foreground dark:hover:bg-accent/50",
                    link: "text-primary underline-offset-4 hover:underline",
                  },
                  size: {
                    default: "h-9 px-4 py-2 has-[>svg]:px-3",
                    sm: "h-8 rounded-md gap-1.5 px-3 has-[>svg]:px-2.5",
                    lg: "h-10 rounded-md px-6 has-[>svg]:px-4",
                    icon: "size-9",
                    "icon-sm": "size-8",
                    "icon-lg": "size-10",
                  },
                },
                defaultVariants: {
                  variant: "default",
                  size: "default",
                },
              }
            )
            
            function Button({
              className,
              variant = "default",
              size = "default",
              asChild = false,
              ...props
            }: React.ComponentProps<"button"> &
              VariantProps<typeof buttonVariants> & {
                asChild?: boolean
              }) {
              const Comp = asChild ? Slot : "button"
            
              return (
                <Comp
                  data-slot="button"
                  data-variant={variant}
                  data-size={size}
                  className={cn(buttonVariants({ variant, size, className }))}
                  {...props}
                />
              )
            }
            
            export { Button, buttonVariants }
            ```
- **Distribution:** A flat-file schema and command-line tool make it easy to distribute components. 
    - ```bash
        npx shadcn@latest add button
        ```

- **AI-Ready:** Open code for LLMs to read, understand, and improve (mcp server).  
    
    - ```json
        {
          "registries": {
            "@acme": "https://acme.com/r/{name}.json"
          }
        }
        ```
- [Figma designs ](https://www.figma.com/community/file/1514746685758799870/obra-shadcn-ui)give a **visual reference for UI consistency**
- Huge ecosystem built around shadcn. 
    1. [shadcn/studio](https://shadcnstudio.com/docs/components/button "shadcn/studio")
    2. [shadcn text editor](https://shadcn-editor.vercel.app/)
    3. [react-dnd-kit-tailwind-shadcn-ui](https://georgegriff.github.io/react-dnd-kit-tailwind-shadcn-ui/)
    4. [shadcn-chat](https://shadcn-chat.vercel.app/)
- Fits well with **React and Next.js**
- Very customizable : 
    1. you can change the whole app theme by changing only **globall.css** file : 
        - [tweakcn](https://tweakcn.com/editor/theme?p=custom)
    2. change component source code.

---

**Pros**

- <p class="callout success">Lightweight and modern styling approach</p>

---

**Cons**

- <p class="callout danger">Learning curve for Tailwind if new to utility-first CSS  
    </p>

---

**Alternative Approaches**

- Material-UI (MUI)
- Ant Design
- Chakra UI
- Custom components from scratch

#### **1. Mobile UI Approach:**

**What solution did I choose?**  
I chose **not to use any mobile component library**.  
I use **NativeWind** for styling, along with **Figma MCP**, **Figma Make**, and **Figma Dev Tools**.

**Why did I choose this solution?**

- The app uses a **fully custom UI designed in Figma**, so prebuilt component libraries are not a good fit
- NativeWind works like **Tailwind CSS**, making styling simple and consistent
- Utility-based styling works well with **LLMs** for generating and adjusting UI code
- Figma MCP and Figma Make help convert design decisions into implementation guidance
- Figma Dev Tools allow developers and LLMs to inspect spacing, colors, and layout accurately
- NativeWind allows theme-based styling (colors, spacing, dark mode)

**Cons**

- <p class="callout danger">No ready-made components out of the box</p>
- <p class="callout danger">More manual work during initial development</p>

### f. Supporting Libraries &amp; Tools

#### Zustand (State Management)

**What solution did I choose?**  
I chose **Zustand** for global state management.

**Why did I choose this solution?**

- Simple and lightweight API
- Minimal boilerplate compared to other state managers
- Works well with React and React Native

**Alternative Approaches**

- Redux Toolkit
- Jotai

---

#### React Query (Server State &amp; Data Fetching)

**What solution did I choose?**  
I chose **React Query** for data fetching and server state management.

**Why did I choose this solution?**

- Handles caching, loading, and error states automatically
- provide all request states by default ( <span class="T286Pc" data-processed="true" data-sfc-cp="">`isPending, isError, isFetching , isLoadin,isFetching`)</span>
- .Reduces manual API state handling
- Works well with REST APIs
- Improves app performance
- Simplifies async data logic

**Alternative Approaches**

- SWR
- Manual data fetching
- Redux Toolkit Query

---

#### Axios (HTTP Client)

**What solution did I choose?**  
I chose **Axios** for making HTTP requests.

**Why did I choose this solution?**

- Simple API
- Supports request and response interceptors. (eg for handling access tokens and refresh tokens)
- Works well with authentication and error handling

**Alternative Approaches**

- Native fetch API
- Ky

---

#### Postman (API Testing)

**What solution did I choose?**  
I chose **Postman** for API testing and debugging.

**Why did I choose this solution?**

- Easy to test APIs during development
- Easy to share requests and collections with the team
- Supports environments and collections
- Postman is simpler and more familiar to the team

**Alternative Approaches**

- Swagger

**Why Postman Over Swagger:**

- **Collaboration &amp; Manual Collection Import**
    
    
    - Easy to share requests and collections with the team
- **Environment Variables**
    
    
    - Supports dev, staging, prod easily for testing
- **Ease of Use**
    
    
    - Postman is simpler and more familiar to the team
- Swagger is mainly for **documentation and simple API testing**, while Postman is primarily for **API testing and debugging**

---

#### next-intl (Internationalization)

**What solution did I choose?**  
I chose **next-intl** for internationalization in the web app.

**Why did I choose this solution?**

- Designed specifically for Next.js
- Supports server and client components
- Easy locale-based routing
- Already using it in Irchademy

**Alternative Approaches**

- react-i18next

---

#### React Hook Form + Zod (Forms &amp; Validation)

**What solution did I choose?**  
I chose **React Hook Form** with **Zod** for form handling and validation.

**Why did I choose this solution?**

- Clean validation logic
- Works well with shadcn (shdacn support it by default)
- Good developer experience
- Schema-based validation
- Strong TypeScript support

**Alternative Approaches**

- Formik + Yup
- Native form handling

#### Moment.js (Date &amp; Time Handling)

**What solution did I choose?**  
I chose **Moment.js** for handling and formatting dates and times.

**Why did I choose this solution?**

- Simplifies date formatting and manipulation
- Easy to use for common date operations
- Widely known and documented
- Handles time zones and localization
- Large ecosystem and examples

**Alternative Approaches**

- Day.js
- date-fns

## 2. Application Architecture &amp; Project Structure


### a. Backend Folder Structure (NestJS)

**What solution did I choose?**

```bash
saheb-backend/
├── src/
│   ├── common/
│   │   ├── decorators/
│   │   │   ├── metadata/
│   │   │   │   ├── public.decorator.ts        # @Public decorator for public routes
│   │   │   │   └── roles.decorator.ts         # @Roles decorator for role-based access
│   │   │   └── requests/
│   │   │       └── current-user.decorator.ts  # @CurrentUser decorator to extract user from request
│   │   ├── entities/
│   │   │   └── base.entity.ts                 # Base entity with common fields
│   │   └── guards/
│   │       └── roles.guard.ts                 # Role-based authorization guard
│   ├── configs/
│   │   ├── database.config.ts                 # Database configuration
│   │   ├── jwt.config.ts                      # JWT configuration
│   │   ├── pino-logger.config.ts              # Logger configuration
│   │   └── throtttle.config.ts                # Rate limiting configuration
│   ├── modules/
│   │   ├── auth/
│   │   │   ├── dto/
│   │   │   │   └── auth.dto.ts                # Auth DTOs (login, register, etc.)
│   │   │   ├── guards/
│   │   │   │   └── access-token.guard.ts      # JWT access token guard
│   │   │   ├── strategies/
│   │   │   │   └── access-token.strategy.ts   # JWT access token strategy
│   │   │   ├── auth.controller.ts             # Auth endpoints (login, register, refresh)
│   │   │   ├── auth.service.ts                # Auth business logic
│   │   │   ├── auth.module.ts                 # Auth module definition
│   │   │   └── auth.constant.ts               # Auth constants
│   │   ├── users/                             # Users module
│   │   ├── app.controller.ts                  # Root controller
│   │   ├── app.service.ts                     # Root service
│   │   └── app.module.ts                      # Main application module
│   └── main.ts                                # Application entry point
├── .env.example                               # Environment variables template
```

**Why did I choose this solution:**

- Keeps code **organized by feature** (config, modules, etc.)
- **Easy to maintain and scale**
- Follows **NestJS best practices**

### b. Frontend Folder Structure (Next.js)

**What solution did I choose?**

```bash
saheb-frontend-skeleton/
├── src/
│   ├── app/
│   │   ├── (dashboard)/dashboard/
│   │   │   ├── page.tsx                   # for example: server component
│   │   │   └── _client.tsx               # for example: client component
│   │   └── login/
│   │       └── page.tsx                   # for example: login page
│   ├── components/
│   │   └── ui/button.tsx                  # for example: UI component
│   ├── i18n/
│   │   └── locales/en.json                # for example: English translations
│   ├── lib/
│   │   └── api-client.ts                  # for example: Axios setup
│   └── store/
│       └── auth.ts                        # for example: Zustand auth store
├── public/                                # Static assets
├── .env.example
├── Dockerfile
└── next.config.ts

```

**Why did I choose this solution:**

- **Make the page a server component by default**
    
    
    - Allows running **server-side logic before rendering the page**
    - Useful for **auth checks, data fetching, or redirection**

### C. Mobile Folder Structure (React Native + Expo)

```bash
─ assets/                        # Images, icons, fonts, etc.
─ scripts/                       # Build or helper scripts
─ src/
│   ├── app/                      # App entry points / pages
│   │   ├── _layout.tsx           # Main layout for all screens
│   │   ├── index.tsx             # Home page
│   │   ├── events.tsx            # Events page
│   │   └── settings.tsx          # Settings page
│   ├── components/               # Reusable UI components
│   │   ├── Table/
│   │   │   ├── Cell.tsx          # Example table cell
│   │   │   └── index.tsx
│   │   ├── BarChart.tsx
│   │   └── Button.tsx
│   ├── screens/                  # Screens composed of components
│   │   ├── Home/
│   │   │   ├── Card.tsx          # Component used only in Home
│   │   │   └── index.tsx         # Home screen
│   │   ├── Events.tsx            # Events screen
│   │   └── Settings.tsx          # Settings screen
│   ├── utils/                     # Reusable helper functions
│   └── hooks/                     # Custom React hooks
│       └── useTheme.ts
├── app.json                       # Expo config
├── eas.json                       # Expo EAS build config
└── package.json                   # Dependencies

```

**Why did I choose this solution:**

- **Pages are in `app/`** → follows **Expo Router rules** for automatic routing
- **Folders in `app/`** → organize related pages together (stacks, tabs, etc.)
- **`/screens/` folder** → keeps **page-specific components** separate and organized
- **Easy to maintain and scale** → adding new pages or layouts is simple
- **Clear separation of concerns** → components, hooks, utils, and assets are all in their own folders

## 3. Localization &amp; Language Support

### a. Multi-language database translation strategy

##### 1. What solution did I choose?

- - ##### **One-Table-Fits-All (global translation table):**
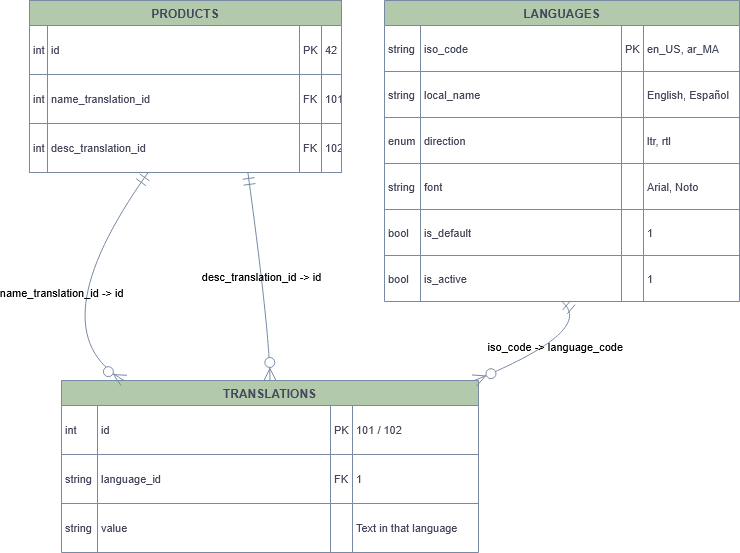
<div drawio-diagram="348"><img src="https://italiano.embouzkoura.space/uploads/images/drawio/2026-01/drawing-1-1767311627.png" alt=""/></div>

##### 2. why did I choose this solution:

- The main table only stores entity-specific data (`id`, `price`, etc.).
- Adding a new language doesn’t require schema changes.\\
- Each translation can be reused by multiple products if needed (e.g., `name_translation_id` = 101 could be shared across entities — though usually IDs are unique per text).
- Adding metadata like `font`, `direction`, or `is_active` is easy via the `languages` table.

##### 3. Cons

- <p class="callout danger">To fetch a product with translations, you need **at least 2 joins**</p>
- <p class="callout danger">Large translations table (all entities’ text in all languages) can become huge</p>
- <p class="callout danger">Requires proper indexing: `(id, language_code)` and `(language_code, value)` for fast lookup</p>
- <p class="callout danger">Caching may be needed for high-traffic</p>
- <p class="callout danger">Hard to maintain and Debug</p>

##### 4. Alternatives

##### 1. Translation Table
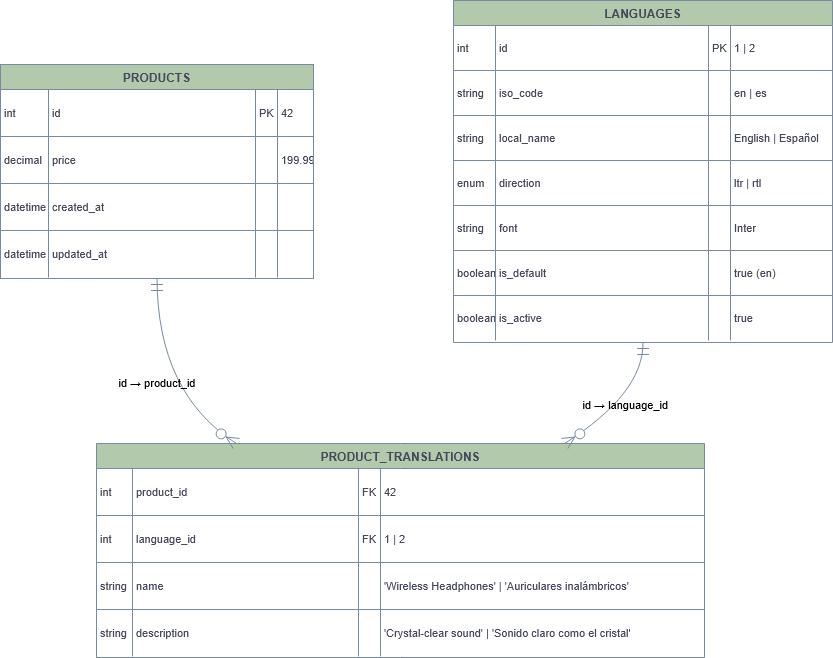
<div drawio-diagram="347"><img src="https://italiano.embouzkoura.space/uploads/images/drawio/2026-01/drawing-1-1767311468.png" alt=""/></div>

##### 2. Pros:

- <p class="callout success">Each entity has its own translation table (`product_translations`)</p>
- <p class="callout success">Easy to understand, manage and debug with for any developer</p>
- <p class="callout success">No magic IDs, no indirection</p>
- <p class="callout success">Very safe data model</p>
- <p class="callout success">One join only</p>

##### 3. Cons:

- <p class="callout danger">**Schema Duplication:** Every translatable entity needs its own table</p>
- <p class="callout danger">Adding Fields Requires Schema Changes.  
    </p>

##### b. App language and RTL (Right-to-Left) support on web and mobile

##### What solution did we choose?

**Mobile**

- `react-i18next` for translations
- `expo-localization` to detect device language
- `I18nManager` for RTL handling
- `NativeWind` for RTL-friendly styling

**Web**

- `next-intl` for internationalization
- Built-in RTL support using **ShadCN UI** and **Radix UI**

---

##### Why did I choose this solution?

- Shared translation concepts between web and mobile
- Automatic language detection from the device or browser
- Full support for **Arabic (RTL)** and **Latin (LTR)** layouts

## 4. Core Domain Logic

##### 1. Qibla Calculation Logic

1. ##### Purpose:
    
    
    - Calculate the **exact direction of the Kaaba** from the user’s location
2. ##### Technology Used:
    
    
    - **adhan-js**
3. ##### Why did I choose this option
    
    
    - Adhan is a well tested and well documented library for calculating Islamic prayer times in JavaScript using Node or a web browser
    - Provides Vriety of Calculation methods
    - Have Other related solutions (Prayers Time Calculation, Sunnah Times)
4. ##### Example:  
    
    
    ```typescript
    var coordinates = new Coordinates(35.78056, -78.6389);
    var qiblaDirection = Qibla(coordinates);
    ```
5. ##### key formula
    
    
    - ```ini
        rotationNeeded = qiblaDirection - phoneHeading
        ```

##### 2. Prayer Time Calculation Methods

1. ##### Purpose
    
    
    - Calculate **daily prayer times** based on location and date.
2. ##### Technology Used:
    
    
    - **adhan-js**
3. ##### Why did I choose this option
    
    
    - Multiple calculation methods
    - Different madhabs
    - High astronomical accuracy
    - Support Manual Adjusments (adding for example 5 to each or specific prayer)
4. ##### Prayer Time Calculation Methods
    
    
    1. **Muslim World League**  
        Standard method used in many countries worldwide.
    2. **Egyptian General Authority of Survey**  
        Official method used in Egypt and some nearby regions.
    3. **University of Islamic Sciences, Karachi**  
        Commonly used in Pakistan, Bangladesh, and parts of India.
    4. **Umm al-Qura University (Makkah)**  
        Official method used in Saudi Arabia.
    5. **Dubai**  
        Method used in the UAE with regional time adjustments.
    6. **Moonsighting Committee**  
        Used mainly in North America, based on moon sighting criteria.
    7. **North America (ISNA)**  
        Standard method used by Islamic Society of North America.
    8. **Kuwait**  
        Method used by the Ministry of Awqaf in Kuwait.
    9. **Qatar**  
        Official method used in Qatar, similar to Umm al-Qura.
    10. **Singapore**  
        Method used in Southeast Asia with rounding rules.
    11. **Tehran (Institute of Geophysics)**  
        Method used in Iran with regional astronomical adjustments.
    12. **Turkey (Diyanet)**  
        Official Turkish religious authority method.
    13. **Other / Custom**  
        Allows manual configuration of calculation parameters.
5. ##### Supported Madhabs
    
    
    - **Shafi (Shafi‘i / Standard)**  
        Used by the majority of Muslims worldwide  
        Asr starts when an object’s shadow is **equal to its height**
    - **Hanafi**  
        Commonly used in South Asia and parts of the Middle East  
        Asr starts when an object’s shadow is **twice its height**
6. ##### Examples:
    
    
    1. Full Example
        
        
        - ```typescript
            import {
              Coordinates,
              CalculationMethod,
              PrayerTimes,
              SunnahTimes,
              Prayer,
              Qibla,
            } from 'adhan';
            import moment from 'moment-timezone';
            
            const coordinates = new Coordinates(35.7897507, -78.6912485);
            const params = CalculationMethod.MoonsightingCommittee();
            const date = new Date();
            const prayerTimes = new PrayerTimes(coordinates, date, params);
            const sunnahTimes = new SunnahTimes(prayerTimes);
            
            moment(prayerTimes.fajr).tz('Africa/Casablanca').format('h:mm A');
            ```
    2. Prayer time date adjustment example: 
        - ```typescript
            const date = new Date(2015, 11, 1);
            const params = CalculationMethod.MuslimWorldLeague();
            params.madhab = Madhab.Shafi;
            const p = new PrayerTimes(new Coordinates(35.775, -78.6336), date, params);
            console.log(moment(p.fajr).tz('America/New_York').format('h:mm A')); # 5:35 AM
            params.adjustments.fajr = 10;
            const p2 = new PrayerTimes(new Coordinates(35.775, -78.6336), date, params);
            console.log(moment(p2.fajr).tz('America/New_York').format('h:mm A')) # 5:45 AM
            ```

##### 2. Hijri time caulculation methods

1. ##### Purpose
    
    
    - Convert Gregorian dates to **Hijri (Islamic) calendar.**
2. ##### Technology Used:
    
    
    - Native Intl API
3. ##### Why did I choose this option
    
    
    - - Multiple calculation methods
        - No external dependency
        - Good performance
        - Works on **modern browsers and mobile**
4. ##### Hijri Calculation Methods
    
    
    1. `islamic`
        
        
        - Astronomical calculation (tabular-based)
        - Consistent and predictable
        - Common default in many environments
    2. `islamic-umalqura`
        
        
        - Based on **Umm al-Qura calendar**
        - Official calendar used in **Saudi Arabia**
        - Most accurate for KSA
    3. ##### `islamic-tbla`
        
        
        - Tabular Islamic calendar
        - Fixed, arithmetic-based
        - Does **not** follow moon sighting
    4. ##### `islamic-civil`
        
        
        - Civil Islamic calendar
        - Simplified tabular system
        - Used mainly for civil/statistical purposes
5. **Example:**
    - ```typescript
        const hijriDate = new Intl.DateTimeFormat(
          "ar-SA-u-ca-islamic",
          {
            day: "numeric",
            month: "long",
            year: "numeric",
          }
        ).format(new Date());
        
        console.log(hijriDate);
        
        ```

## 6. Media Management

### 1. Audio resource handling (Sermon / موعظة)

1. ##### What solution did I choose?
    
    
    - **AWS S3** for hosting all audio content
2. ##### Why did I choose <span style="color: rgb(68, 68, 68);">this solution?</span>

- - **AWS S3** for storing audio and video files
    - **CloudFront CDN (content delivery network)** for fast streaming and global delivery
    - Already using it on our apps
    - easy to test and debug with **Minio S3**

### 2. Video hosting and streaming strategy

1. ##### What solution did I choose?
    
    
    - **YouTube** for hosting all video content
2. ##### Why did I choose <span style="color: rgb(68, 68, 68);">this solution?</span>
    
    
    - <span style="color: rgb(68, 68, 68);">Free and reliable hosting</span>
    - <span style="color: rgb(68, 68, 68);">Automatic **adaptive streaming** for all devices</span>
    - <span style="color: rgb(68, 68, 68);">Handles all **video encoding, formats, and resolutions**</span>
    - <span style="color: rgb(68, 68, 68);">Easy embedding in web/mobile apps</span>
    - <span style="color: rgb(68, 68, 68);">Already implemented with Maraqi</span>
3. ##### <span style="color: rgb(68, 68, 68);">Example from maraqi</span>
    
    
    - <span style="color: rgb(68, 68, 68);">[![Screenshot_2025-12-24-11-02-21-001_com.maraqi.appmobile.jpg](https://italiano.embouzkoura.space/uploads/images/gallery/2026-01/scaled-1680-/screenshot-2025-12-24-11-02-21-001-com-maraqi-appmobile.jpg)](https://italiano.embouzkoura.space/uploads/images/gallery/2026-01/screenshot-2025-12-24-11-02-21-001-com-maraqi-appmobile.jpg)</span>
4. ##### <span style="color: rgb(68, 68, 68);">Alternatives</span>
    
    
    - <span style="color: rgb(68, 68, 68);">Vimeo</span>
    - <span style="color: rgb(68, 68, 68);">AWS S3</span>

## 6. Notifications &amp; Communication

### 1. Scheduling notificaiton

1. ##### Purpose
    
    
    - Keep users **engaged and informed for prayer times, acts...**
    - Deliver **timely updates** (push notifications, emails)
    - Support **daily schedules, prayer reminders, or app events**
    - Ensure notifications are **reliable, even if the app crashes**
2. ##### What solution did I choose?
    
    
    1. ##### Technologies
        
        
        - **NestJS Cron** – scheduling jobs
        - **BullMQ (Redis-based queue)** – delayed job processing
        - **Expo Push Notifications / FCM / APNs** – mobile notifications
        - **Nodemailer / Email providers** – email notifications
        - **moment-timezone timezone library** for user timezone handling
    2. ##### Implementation:
        
        
        - **NestJS Cron** runs every midnight
        - Cron **creates a BullMQ queue** for only **that day’s notifications** and based on the user timezone
        - Each notification in the queue has a **delay** for its scheduled time
3. ##### Why did I choose this solution?
    
    
    - Avoid running a **heavy cron every minute**
    - Node.js event loop **cannot handle large number of delayed notifications** directly
    - Using BullMQ queues allows:
        
        
        - **Reliable scheduling**
        - **Retry mechanisms**
        - Scalable background processing
4. ##### Logic Summary
    
    
    1. At **midnight**, the cron job collects all notifications for the current day
    2. Pushes them into a **BullMQ queue** with their **scheduled delay** based on user timezone
    3. Worker processes the queue and sends the notification at the correct time
5. ##### Technical Challenges
    
    
    1. Handling **large volume** of notifications without blocking Node event loop
    2. Ensuring **notifications are sent even if the app or server restarts**
    3. Avoiding **expensive cron runs** every minute/hour
    4. Synchronizing **user timezones** for delivery

### 2. Timezone-Aware Push Notification System

1. ##### Purpose
    
    
    - Ensure notifications are delivered **at the correct local time** for each user
    - Support **global users in different timezones**
    - Maintain **reliability and accuracy** for time-sensitive events
2. ##### What solution did I choose?
    
    
    - - **Moment-timezone** – convert timezone to user local time
        - **Geo-TZ** – get timezone from latitude/longitude
        - **BullMQ** – queue and schedule delayed notifications
3. ##### Why did I choose this solution
    
    
    - Users may be in **different timezones**, so server time alone isn’t enough
    - Moment-timezone allows **precise conversion** of UTC times to user local time
    - Combined with BullMQ, notifications **fire at correct local time** without blocking server
4. Implementation Example: 
    - ```typescript
        import * as moment from 'moment-timezone';
        import { find } from 'geo-tz';
        
        const latitude = 34.020882;
        const longitude = -6.841650;
        
        // Determine user's timezone from coordinates
        const timezones = find(latitude, longitude);
        const timezone = timezones[0] || 'UTC';
        
        // Example: convert a UTC time to user's local time
        const utcTime = new Date('2026-01-02T12:00:00Z');
        const localTime = moment(utcTime).tz(timezone).format('HH:mm');
        
        console.log(`Notification should fire at local time: ${localTime}`);
        
        ```

### 3. Email notification

1. ##### What solution did I choose
    
    
    - **NestJS MailerModule** integrated with **Mailgun API**
    - Emails are sent through **Mailgun’s transactional service**
2. ##### Technologies
    
    
    - **@nestjs-modules/mailer** – NestJS module for sending emails
    - **Mailgun** – Transactional email service with API/SMTP integration
    - **Handlebars** – for dynamic email templates
    - **BullMQ** – for queueing scheduled emails
3. ##### Why did I choose this solution?
    
    
    - Mailgun is Well known and used
    - NestJS Mailer is **well-integrated** with the framework
    - Easy to **use templates** for personalized content
    - Works seamlessly with **queues** for delayed or scheduled emails

## 7. Application Standards

### 1. Authentication and Authorization

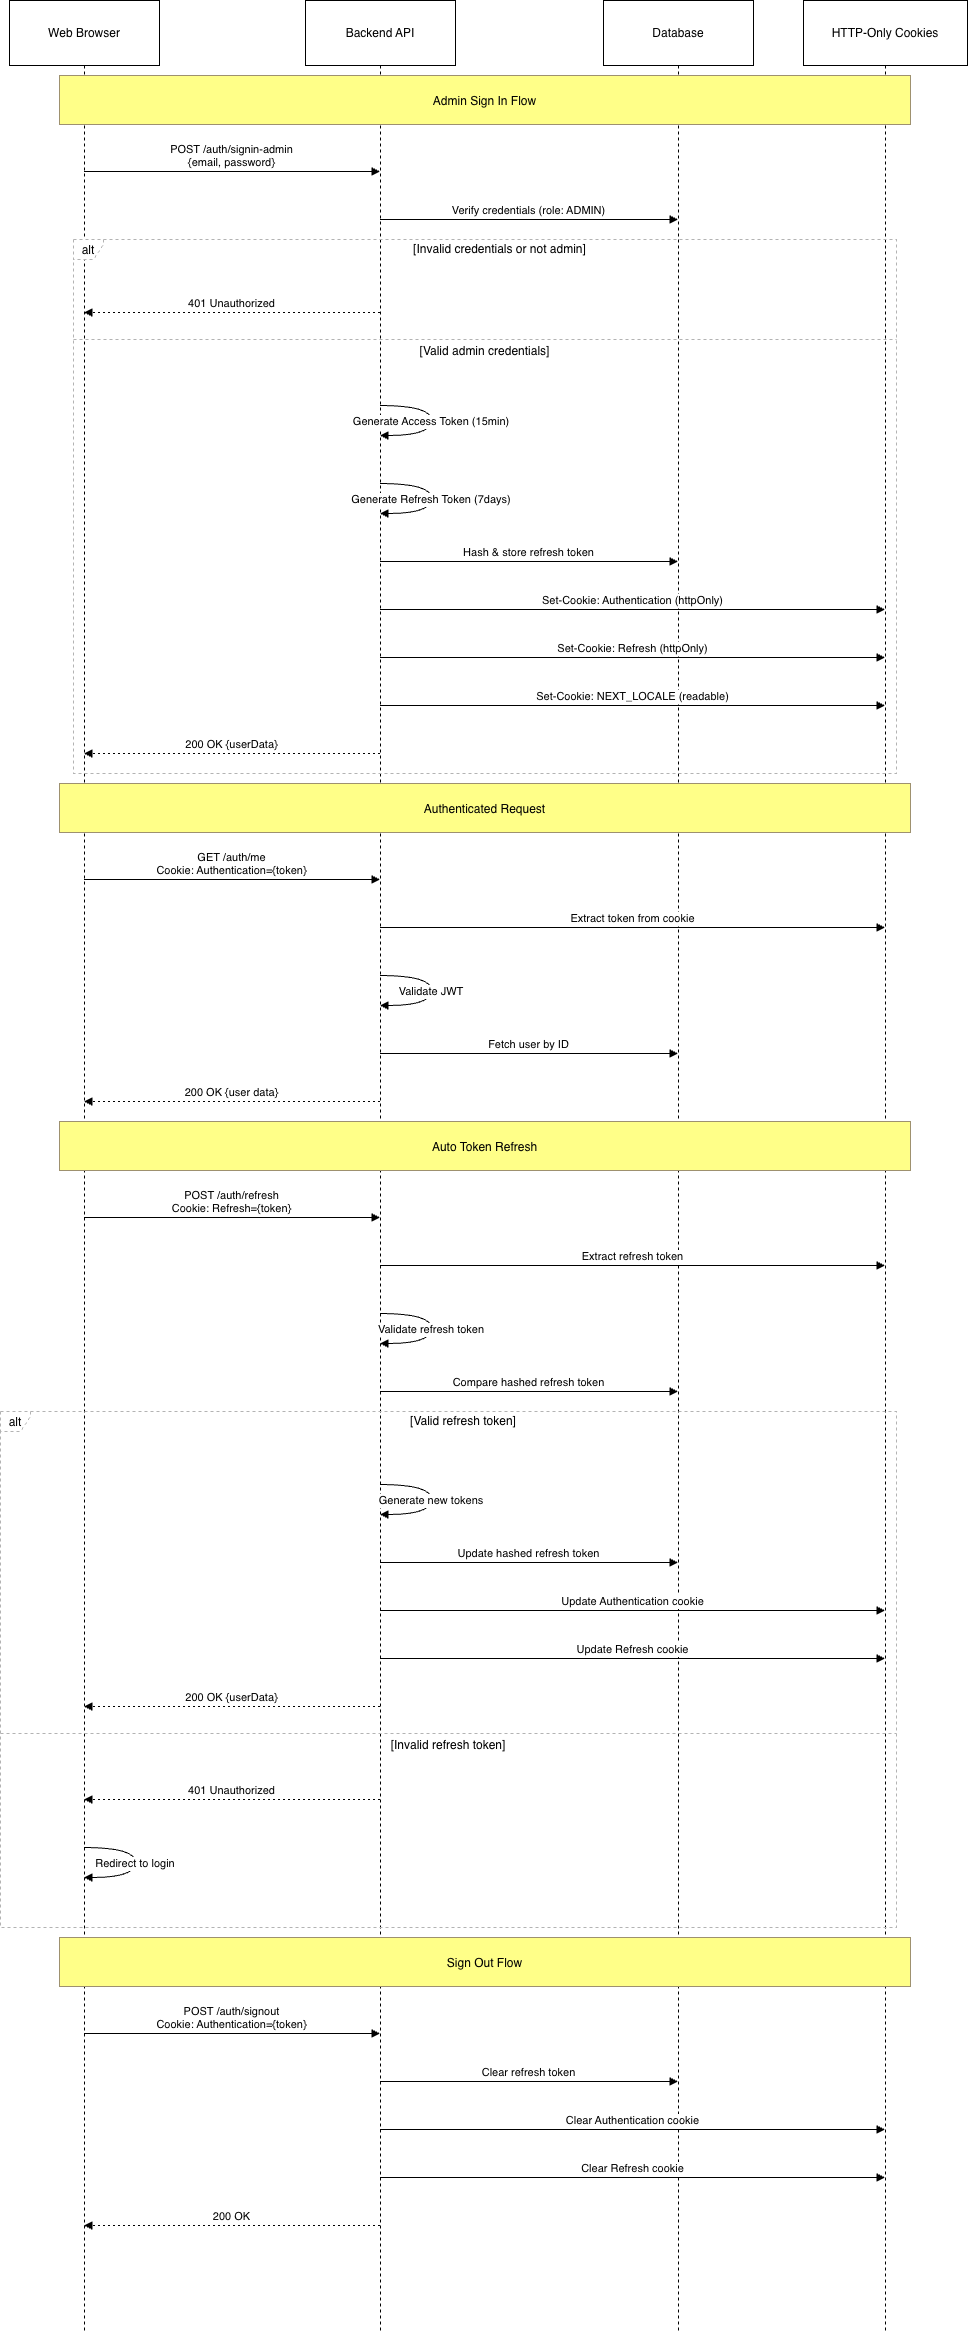
1. ##### What solution did I choose
    
    
    - We chose a **Passport.js–based authentication system** using:
        
        
        - Local strategy for login
        - JWT access and refresh tokens
        - Separated strategies per user type (normal user / admin)
        - Different token storage strategies for web and mobile
        - RBAC for access control
    - ##### Technologies
        
        
        - **Passport.js** (NestJS integration)
        - **JWT (Access &amp; Refresh Tokens)**
        - **bcrypt** (password and refresh token hashing)
        - **HTTP-only cookies (Web)**
        - **Expo Secure Store (Mobile)**
2. ##### Why did I choose this solution?
    
    
    - **Password Hashing**: Bcrypt with 10 salt rounds
    - **Refresh Token Hashing**: Stored as bcrypt hash in database
    - **HTTP-Only Cookies** (Web): Prevents XSS attacks
    - **Secure Cookies**: Enabled in production
    - **Crypted Storage** (Mobile)**:** `expo-secure-store` provides a way to encrypt and securely store key-value pairs locally on the device
    - **Token Rotation**: New refresh token on each refresh
    - **Single Session**: Old refresh token invalidated on new login
    - **RBAC**: manages user access to systems
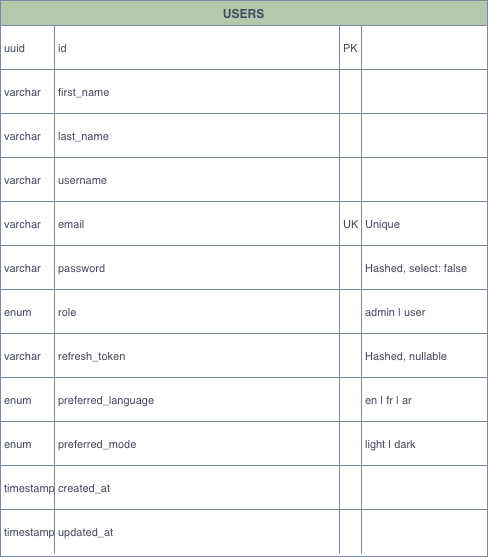
3. ##### Breaking down the Authentication and Authorization design system

- - User database design: 
        - <div drawio-diagram="351"><img src="https://italiano.embouzkoura.space/uploads/images/drawio/2026-01/drawing-1-1767364332.png" alt=""/></div>
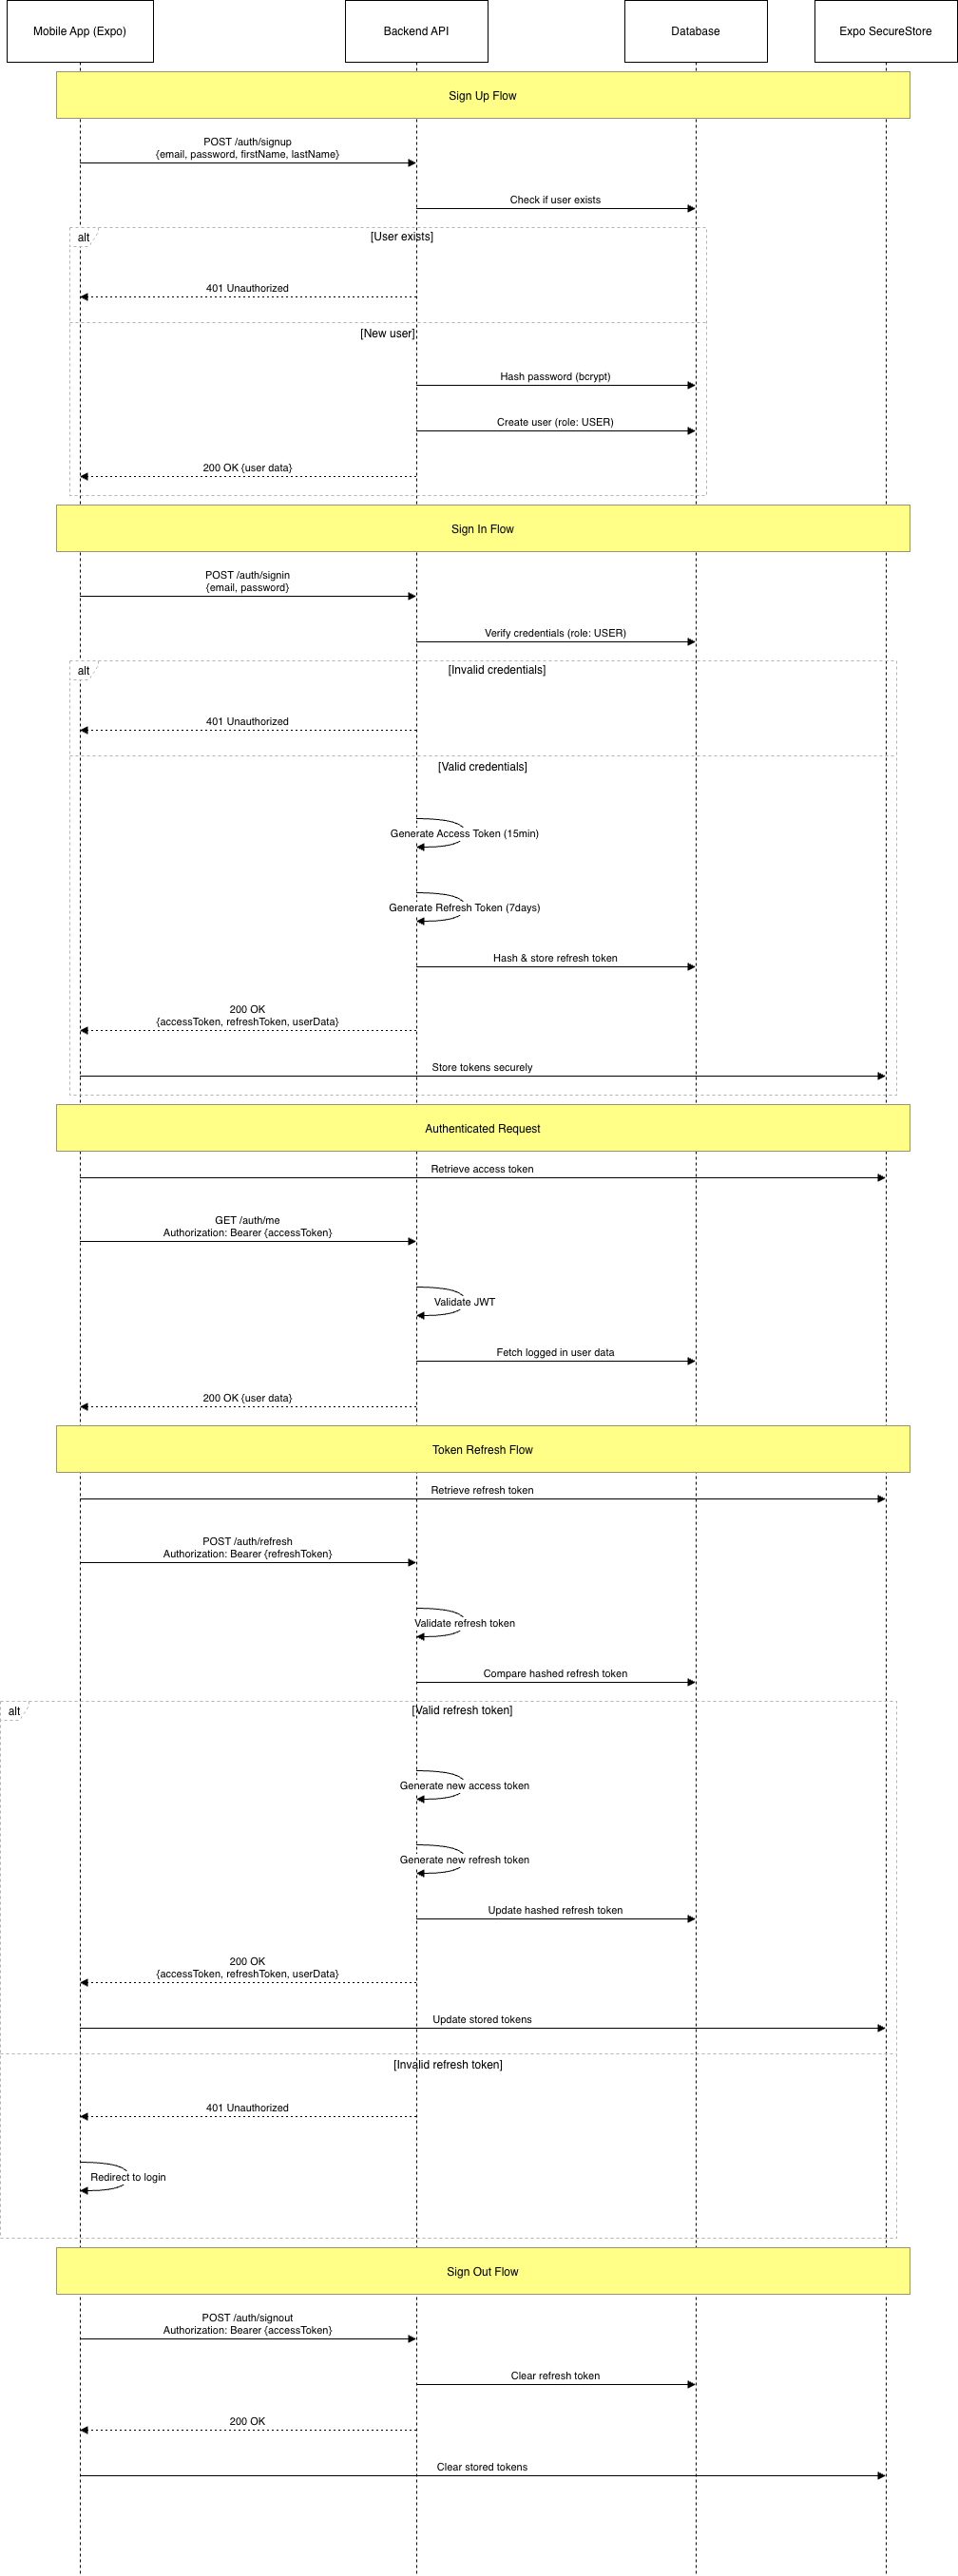
    - Mobile Authentication and Authorization Flow

<div drawio-diagram="354"><img src="https://italiano.embouzkoura.space/uploads/images/drawio/2026-01/drawing-1-1767365705.png" alt=""/></div>

- ##### Web Authentication and Authorization Flow
- <div drawio-diagram="355"><img src="https://italiano.embouzkoura.space/uploads/images/drawio/2026-01/drawing-1-1767365794.png" alt=""/></div>
- ##### Role-Based Access Control (RBAC)


- - ##### Roles

```typescript
enum Role {
ADMIN = 'admin',
USER = 'user'
}
```

- - ##### Implementation

1. 1. 1. **`@Roles() `Decorator**: Define required roles for endpoints
        2. `<strong>RolesGuard</strong>`: Validates user has required role
        3. **`@Public() `Decorator**: Bypass authentication for public routes

- - ##### Example Usage

```typescript
@Roles(Role.ADMIN)
@Get('admin-only')
adminOnlyEndpoint() {
// Only accessible by admins
}
```

### 2. Request logging

1. ##### Purpose
    
    Track incoming requests and application behavior for debugging, monitoring, and auditing across backend services
2. ##### What solution did I choose
    
    
    - We chose **nestjs-pino Logger plus AWS** as the primary logging solution, with **pino-pretty** enabled in development mode for readable logs
3. ##### How It Works
    
    
    - All HTTP requests are automatically logged
    - Logs include:
        
        
        - HTTP method
        - URL
        - Status code
        - Response time
        - Request Body
        - Request query
        - Request params
        - Ip address
        - User logged in for authenticated requests
        - App logs
        - User agent
        - Platform
    - In development:
        
        
        - Logs are formatted using `pino-pretty`
    - In production:
        
        
        - Logs remain structured JSON for log aggregation tools
4. ##### Why did I choose this solution?
    
    
    - - Well-integrated with NestJS through the `nestjs-pino` package
        - Simple and and have huge logging configuration
        - Produces structured JSON logs for production environments
        - Provides human-readable logs during development
5. ##### Alternatives
    
    
    - Winston

### 3. User event and activity tracking

1. ##### Purpose
    
    
    - Track important user actions across the application for:
        
        
        - Auditing
        - Debugging
        - Analytics
        - Security monitoring
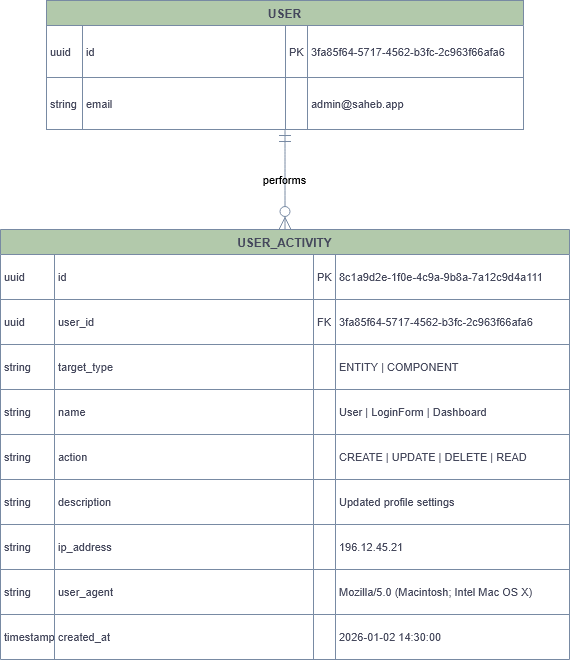
2. ##### What solution did I choose?
    
    We chose a **database-driven user activity tracking system**, implemented using:
    
    
    - A dedicated `user_activities` table
    - **TypeORM entity event listeners** to capture actions automatically
3. ##### Why did I choose this solution?
    
    I chose this approach because:
    
    
    - It provides a centralized and consistent way to track user actions
    - Some events relate to **UI components**, not entities
    - It avoids polluting controllers and services with logging logic
    - It is easy to extend as the system grows
    - It works uniformly for web and mobile clients
    - It is suitable for auditing, debugging, and analytics use cases
4. ##### How does it work?
    
    
    - Important entities and actions are observed using **TypeORM subscribers**
    - When an action occurs (`CREATE`, `UPDATE`, `DELETE`)
    - The system records:
        
        
        - Who did the action (`user_id`)
        - What was affected (`name` → entity or component name)
        - The type of action (`action`)
        - Optional description
    - A row is saved in the `user_activities` table
5. ##### Database Design System
    
    
    - <div drawio-diagram="357"><img src="https://italiano.embouzkoura.space/uploads/images/drawio/2026-01/drawing-1-1767394121.png" alt=""/></div>
6. ##### Typeorm Subscriber
    
    
    - ```typescript
        @Injectable()
        @EventSubscriber()
        export class ActivitySubscriber implements EntitySubscriberInterface {
          private excludedEntities = [
            UserActivity.name, // avoid recursive logging
          ];
        
          constructor(
            @Inject(DataSource) dataSource: DataSource,
            private readonly cls: ClsService,
            private readonly activityService: ActivityService,
          ) {
            dataSource.subscribers.push(this);
          }
        
          private get user() {
            return this.cls.get('user');
          }
        
          private get requestInfo() {
            return this.cls.get('requestInfo');
          }
        
          async afterInsert(event: InsertEvent<any>) {
            await this.log(event, 'CREATE');
          }
        
          async afterUpdate(event: UpdateEvent<any>) {
            await this.log(event, 'UPDATE');
          }
        
          async afterRemove(event: RemoveEvent<any>) {
            await this.log(event, 'DELETE');
          }
        
          private async log(
            event: InsertEvent<any> | UpdateEvent<any> | RemoveEvent<any>,
            action: ActivityAction,
          ) {
            const entityName = event.metadata.targetName;
        
            if (this.excludedEntities.includes(entityName)) return;
        
            await this.activityService.create({
              user_id: this.user?.id ?? null,
              target_type: 'ENTITY',
              name: entityName,
              action,
              description: null,
              ip_address: this.requestInfo?.ip,
              user_agent: this.requestInfo?.userAgent,
            });
          }
        }
        
        ```

### 3. API Versioning

1. ##### Technologies
    
    
    - NestJS built-in versioning
2. ##### What Solution did I choose?
    
    
    - I choose **route-based API versioning** with NestJS. The default version is `1`, and it’s applied in the URI.
3. ##### Why did I choose this solution?
    
    
    - Simple and clear for clients to see which API version they are using.
    - Works well with RESTful routes and web/mobile clients.
    - Easy to maintain multiple versions simultaneously.
    - Used widely
4. ##### How it works
    
    
    - ```typescript
        import { VersioningType } from '@nestjs/common';
        import { NestFactory } from '@nestjs/core';
        import { AppModule } from './app.module';
        
        async function bootstrap() {
          const app = await NestFactory.create(AppModule);
        
          // Enable route-based versioning
          app.enableVersioning({
            type: VersioningType.URI,
            defaultVersion: '1',
          });
        
          await app.listen(3000);
        }
        bootstrap();
        ```
    - With this, routes will look like: 
        - ```c
            /v1/auth/signin
            /v1/users/me
            /v2/auth/signin   // future version
            ```
5. ##### Alternative Approaches
    
    
    - Header-based versioning (`Accept` header)
    - Media type versioning (`application/vnd.app.v1+json`)
    - Query parameter versioning (`?v=1`)

### 4 .File Upload handling

1. ##### What solution did I choose?
    
    
    - I choose **direct upload using presigned Urls to AWS S3 using the AWS SDK with NestJS** for **large files** (e.g., app videos uploaded via the web). For **small files** (e.g., user profile pictures), I use **Multer** to handle uploads on the server.
2. ##### Why did I choose this solution?
    
    
    - **Large files:** Direct S3 upload avoids overloading the server, bypasses Node.js memory limits, and allows faster uploads.
    - **Small files:** Multer is simple and works well for small files where server processing or validation might be needed.

### 5. Data Validation

1. ##### What solution did I choose?
    
    
    - I choose **NestJS ValidationPipe** together with **class-validator** and **class-transformer**, using **DTOs** for all CRUD actions.
2. ##### Why did I choose this solution?
    
    
    - Ensures that all incoming requests are **properly validated** before hitting the service layer.
    - Works seamlessly with TypeScript and DTOs, keeping backend code clean and safe.
    - Supports automatic **data transformation** (e.g., string to number) via `class-transformer`.
    - It uses Nestjs Best practices
3. ##### How it works
    
    
    - Create DTOs for each action (e.g., `CreateUserDto`, `UpdateUserDto`, `GetUserDto`) with **decorators** from `class-validator`.
    - Apply the `ValidationPipe` globally or per-route with options 
        - ```typescript
            import { ValidationPipe } from '@nestjs/common';
            
            app.useGlobalPipes(
              new ValidationPipe({
                transform: true,         // Automatically transform payload to DTO class instances
                whitelist: true,         // Strip properties that are not in the DTO
                forbidNonWhitelisted: true, // Throw an error if extra properties are present
                forbidUnknownValues: true,  // Ensure only known types are allowed
              }),
            );
            
            ```
4. ##### cURL Example: ValidationPipe rejecting extra property
    
    
    - ```typescript
        import { IsEmail, IsNotEmpty, MinLength } from 'class-validator';
        
        export class CreateUserDto {
          @IsNotEmpty()
          firstName: string;
        
          @IsNotEmpty()
          lastName: string;
        
          @IsEmail()
          email: string;
        
          @MinLength(6)
          password: string;
        }
        
        ```
    - If someone tries to inject an extra field `role`: 
        - ```bash
            curl -X POST http://localhost:3000/auth/signup \
              -H "Content-Type: application/json" \
              -d '{
                "firstName": "John",
                "lastName": "Doe",
                "email": "john@example.com",
                "password": "123456",
                "role": "ADMIN"
              }'
            ```
    - Response: 
        - ```json
            {
              "statusCode": 400,
              "message": [
                "property role should not exist"
              ],
              "error": "Bad Request"
            }
            
            ```

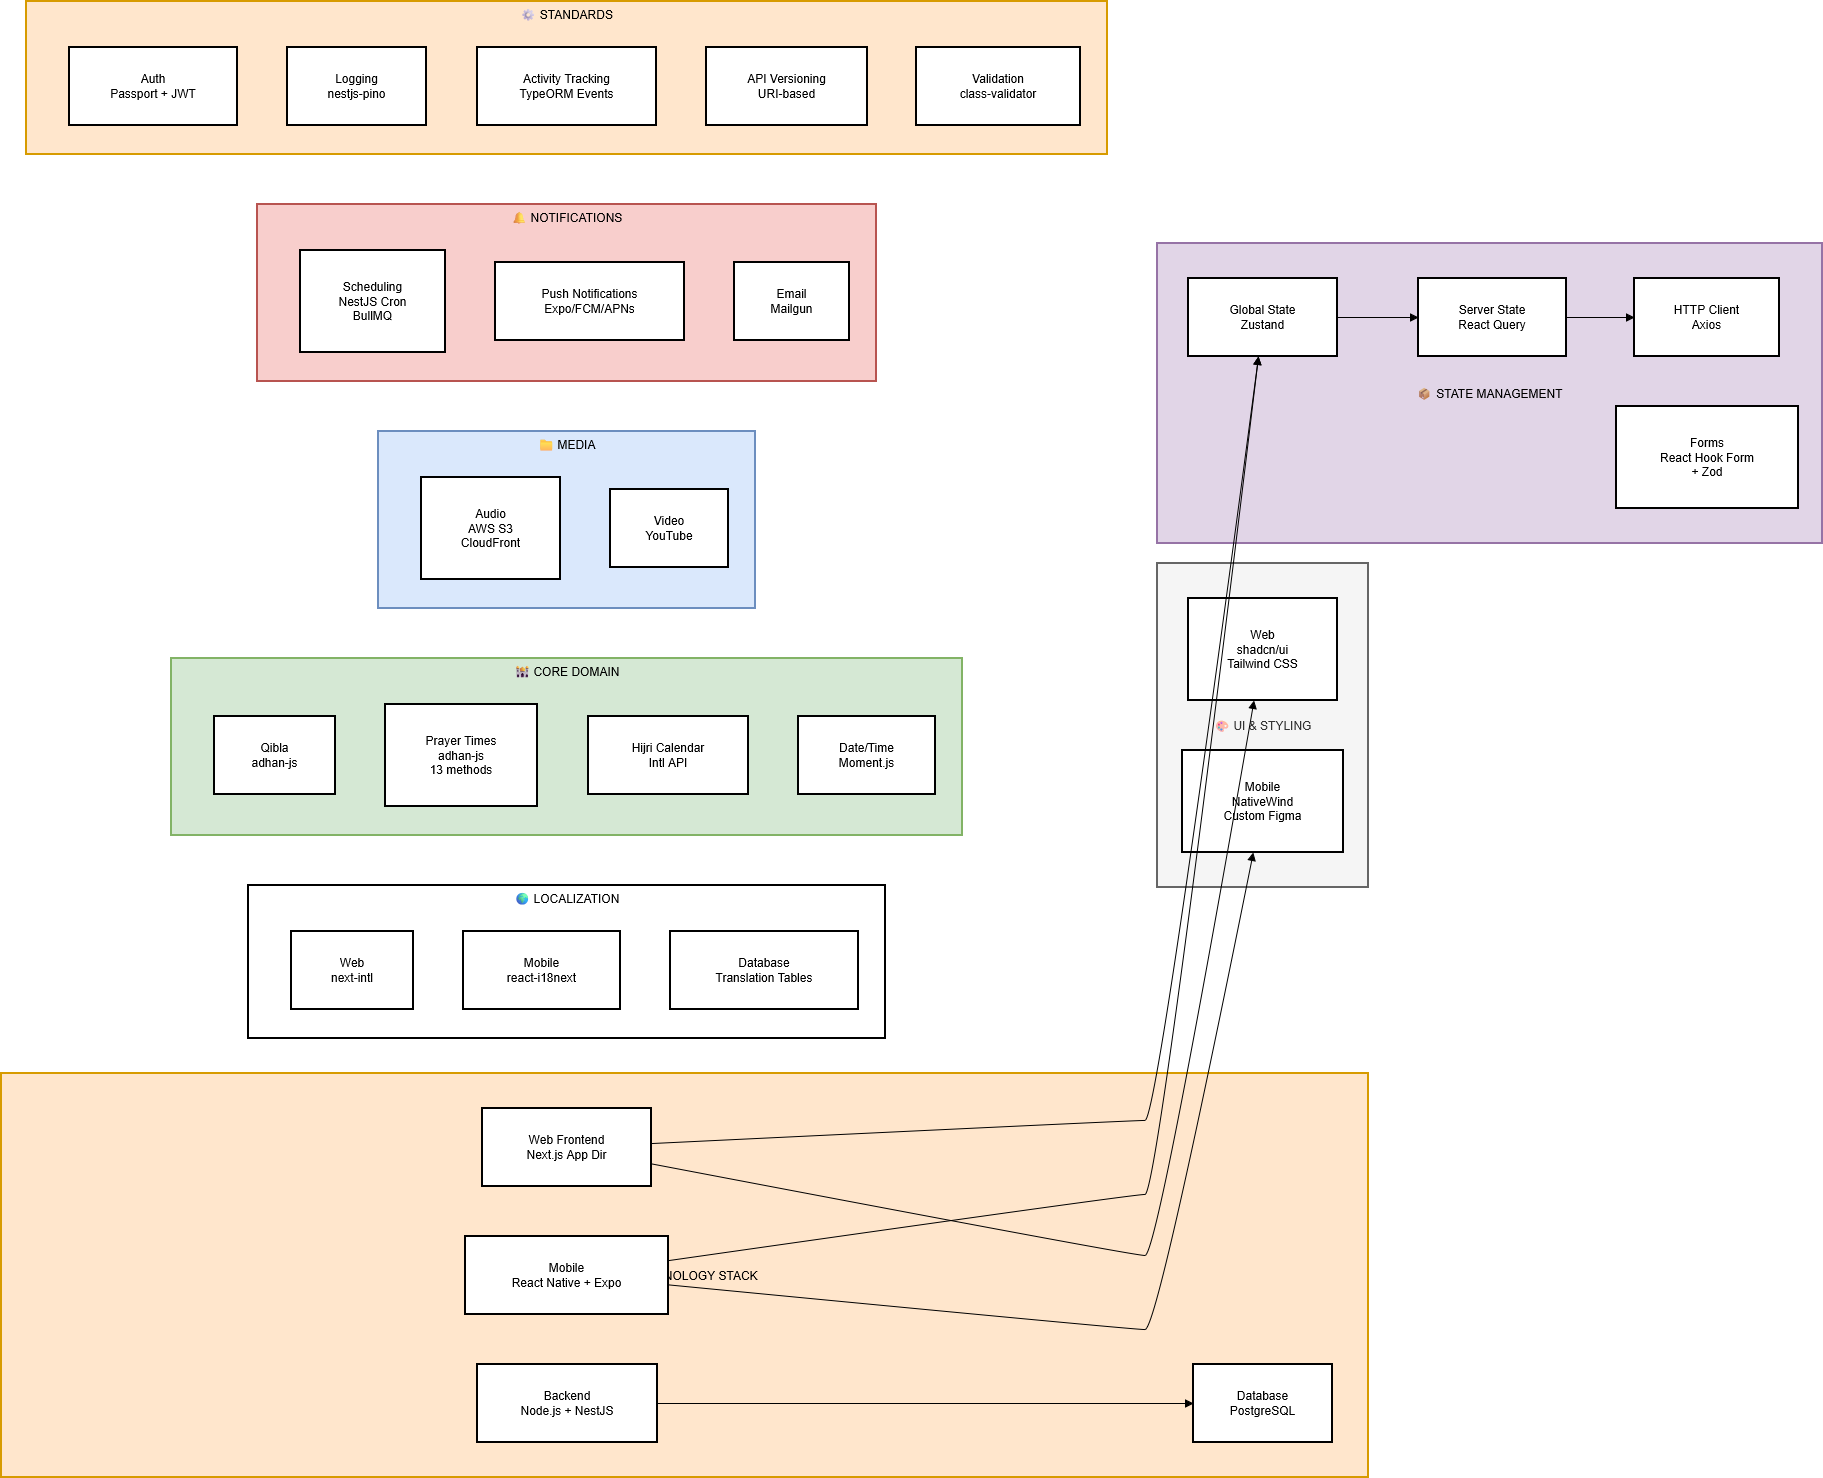
## Summary

<div drawio-diagram="358"><img src="https://italiano.embouzkoura.space/uploads/images/drawio/2026-01/drawing-1-1767396717.png" alt=""/></div>

<div class=" panel-bg panel-border rounded-[6px] shadow-step" id="bkmrk--64"><div aria-label="highlighted-code-language-typescript" class="language-typescript relative overflow-hidden bg-ide-editor-background rounded-b-[6px]"><div class="overflow-x-auto bg-ide-editor-background p-[1em]"><div class="monaco-tokenized-source">  
</div></div></div></div>