Update on Saheb Development Plan
Purpose of This Documentation
This presentation covers sections that required further research.
Key Points
This is the list of topics we will cover:
-
- Local-First App Architecture
- Handling Local Notifications
- Auth Flow (Web And Mobile)
-
Database Technology
-
Logging Security and Strategy
-
Processing Tasks with BullMQ in NestJS -
OneSignal or Expo -
Versioning Strategy
- Crash Reporting (Sentry)
- Styling
- Saving initial data localy?
1. Local-First App Architecture
Local-first apps keep data locally, only using the cloud to synchronize data between machines (or peer‑to‑peer) and it prioritizes storing and manipulating data in a local database on the user's device
Choice: WatermelonDB (SQLite-based)
Why
-
- Offline-First by Design
- a high-performance database built on top of SQLite, specifically designed for offline-first and sync-based mobile applications.
-
stores all application data locally on the user’s device using SQLite.
-
The application remains fully usable without any internet connection.
-
All reads and writes happen locally.
-
Network availability does not block user actions.
- Synchronization
-
provides a manual synchronization mechanism based on two explicit phases:
-
Push local changes to the backend
-
Pull remote changes from the backend
-
-
- WatermelonDB does not impose any backend technology, it means u can use it with any backend technology
- Offline-First by Design
Setup Example
database.ts
import { Database } from '@nozbe/watermelondb';
import SQLiteAdapter from '@nozbe/watermelondb/adapters/sqlite';
import { schema } from './schema';
import { Note } from './note.model';

const adapter = new SQLiteAdapter({
  schema,
});

export const database = new Database({
  adapter,
  modelClasses: [Note],
});
schema.ts
import { appSchema, tableSchema } from '@nozbe/watermelondb';

export const schema = appSchema({
  version: 1,
  tables: [
    tableSchema({
      name: 'notes',
      columns: [
        { name: 'title', type: 'string' },
        { name: 'content', type: 'string' },
        { name: 'updated_at', type: 'number' },
        { name: 'deleted_at', type: 'number', isOptional: true },
      ],
    }),
  ],
});
note.model.ts
import { Model } from '@nozbe/watermelondb';
import { field } from '@nozbe/watermelondb/decorators';

export class Note extends Model {
  static table = 'notes';

  @field('title') title!: string;
  @field('content') content!: string;
  @field('updated_at') updatedAt!: number;
  @field('deleted_at') deletedAt?: number;
}
sync.ts
import { synchronize } from '@nozbe/watermelondb/sync'

async function mySync() {
  await synchronize({
    database,
    pullChanges: async ({ lastPulledAt, schemaVersion, migration }) => {
      const urlParams = `last_pulled_at=${lastPulledAt}&schema_version=${schemaVersion}&migration=${encodeURIComponent(
        JSON.stringify(migration),
      )}`
      const response = await fetch(`https://my.backend/sync?${urlParams}`)
      if (!response.ok) {
        throw new Error(await response.text())
      }

      const { changes, timestamp } = await response.json()
      return { changes, timestamp }
    },
    pushChanges: async ({ changes, lastPulledAt }) => {
      const response = await fetch(`https://my.backend/sync?last_pulled_at=${lastPulledAt}`, {
        method: 'POST',
        body: JSON.stringify(changes),
      })
      if (!response.ok) {
        throw new Error(await response.text())
      }
    },
    migrationsEnabledAtVersion: 1,
  })
}
Usage
Quick (over-simplified) example: an app with posts and comments.
First, you define Models:
class Post extends Model {
  @field('name') name
  @field('body') body
  @children('comments') comments
}

class Comment extends Model {
  @field('body') body
  @field('author') author
}
const Post = ({ postId }) => (
  <View>
    <Text>{post.name}</Text>
    <Text>Comments:</Text>
    {comments.map(comment =>
      <EnhancedComment key={comment.id} comment={comment} />
    )}
  </View>
)

const enhance = withObservables(['post'], ({ postId }) => ({
  post: database.collections.get('posts').findAndObserve(postId),
  comments: post.comments
}))
And now you can render the whole Post:
Then, you connect components to the data:
const Comment = ({ comment }) => (
  <View style={styles.commentBox}>
    <Text>{comment.body} — by {comment.author}</Text>
  </View>
)

// This is how you make your app reactive! ✨
const enhance = withObservables(['comment'], ({ comment }) => ({
  comment,
}))
const EnhancedComment = enhance(Comment)
Whenever comment changes in the database, EnhancedComment automatically re-renders with the new data.
Implementing the Sync Backend
Understanding the changes Object
WatermelonDB synchronizes data using a table-based changes object.
Each table contains three arrays:
-
-
created: newly created records -
updated: updated records -
deleted: IDs of deleted records only
-
Example changes Object
{
  "notes": {
    "created": [
      { "id": "n1", "title": "Todo", "content": "Buy milk", "updated_at": 1700000000 }
    ],
    "updated": [
      { "id": "n2", "title": "Ideas", "content": "Startup idea", "updated_at": 1700000100 }
    ],
    "deleted": ["n3"]
  }
}
2. Handling Local Notifications
Notification Types
There are two main types of notifications in mobile applications:
Local Notifications
-
-
Triggered directly on the device.
-
Do not require an internet connection.
-
Push Notifications
-
-
Sent from a remote server.
-
Require internet connectivity.
-
Current Choice: Local Notifications Only
-
- For the current scope of the application, we only require local notifications.
why
-
-
The application must work fully offline.
-
No dependency on backend availability.
-
Background Notification Handling (Prayer Time Example)
Some notifications, such as prayer time reminders, must be triggered even when the application is not actively running.
To handle this, we use:
Expo Task Manager
-
-
Runs background tasks on the device.
-
Allows scheduling logic to execute even when the app is closed.
-
Example use case:
-
-
A background task calculates the next prayer times.
-
Local notifications are scheduled accordingly.
-
The user receives reminders on time, even offline.
-
3. Auth Flow (Web and Mobile)
Overview
How the Flows Are Separated
1. Separate API Endpoints
- End Users: All endpoints under /auth/user/*
-
/auth/user/signin
-
/auth/user/me
-
/auth/user/signout
-
- etc.
- Admins: All endpoints under /auth/admin/*
-
/auth/admin/signin
-
/auth/admin/me
-
/auth/admin/signout
-
- etc.
2. Separate Database Tables
- End Users: Stored in users table
- Admins: Stored in admin_users table
3. Separate JWT Secrets
- End Users: Use USER_JWT_ACCESS_SECRET and USER_JWT_REFRESH_SECRET
- Admins: Use ADMIN_JWT_ACCESS_SECRET and ADMIN_JWT_REFRESH_SECRET
4. Different Authentication Methods
- End Users (Mobile): Bearer token authentication.
- Tokens returned in response body after login
- Access token sent in
Authorization: Bearer <token>header - Refresh token sent in request body when refreshing Mobile-friendly (no cookie dependency)
- Admins (Web): HTTP-only cookie authentication
- Tokens stored in secure HTTP-only cookies
- Cookies automatically sent with requests
- Cookies named
AdminAuthenticationandAdminRefresh - Web-optimized security
5. Complete Authentication Architecture Overview

4. Database Technology
Choice: PostgreSQL
Why
-
-
Our data is structured, not dynamic, so a relational DB fits naturally.
- We are using SqliteDB on mobile app, so it will be easier to sync the data (Both dbs are SQL)
-
We have complex queries, especially in the database translation system, which benefit from SQL capabilities.
-
Strong support for views and transactions ensures data consistency and simplifies reporting or multi-step operations
-
PostgresSQL (SQL) VS MongoDB (NoSQL)
Based on this amazon article this is the key differences
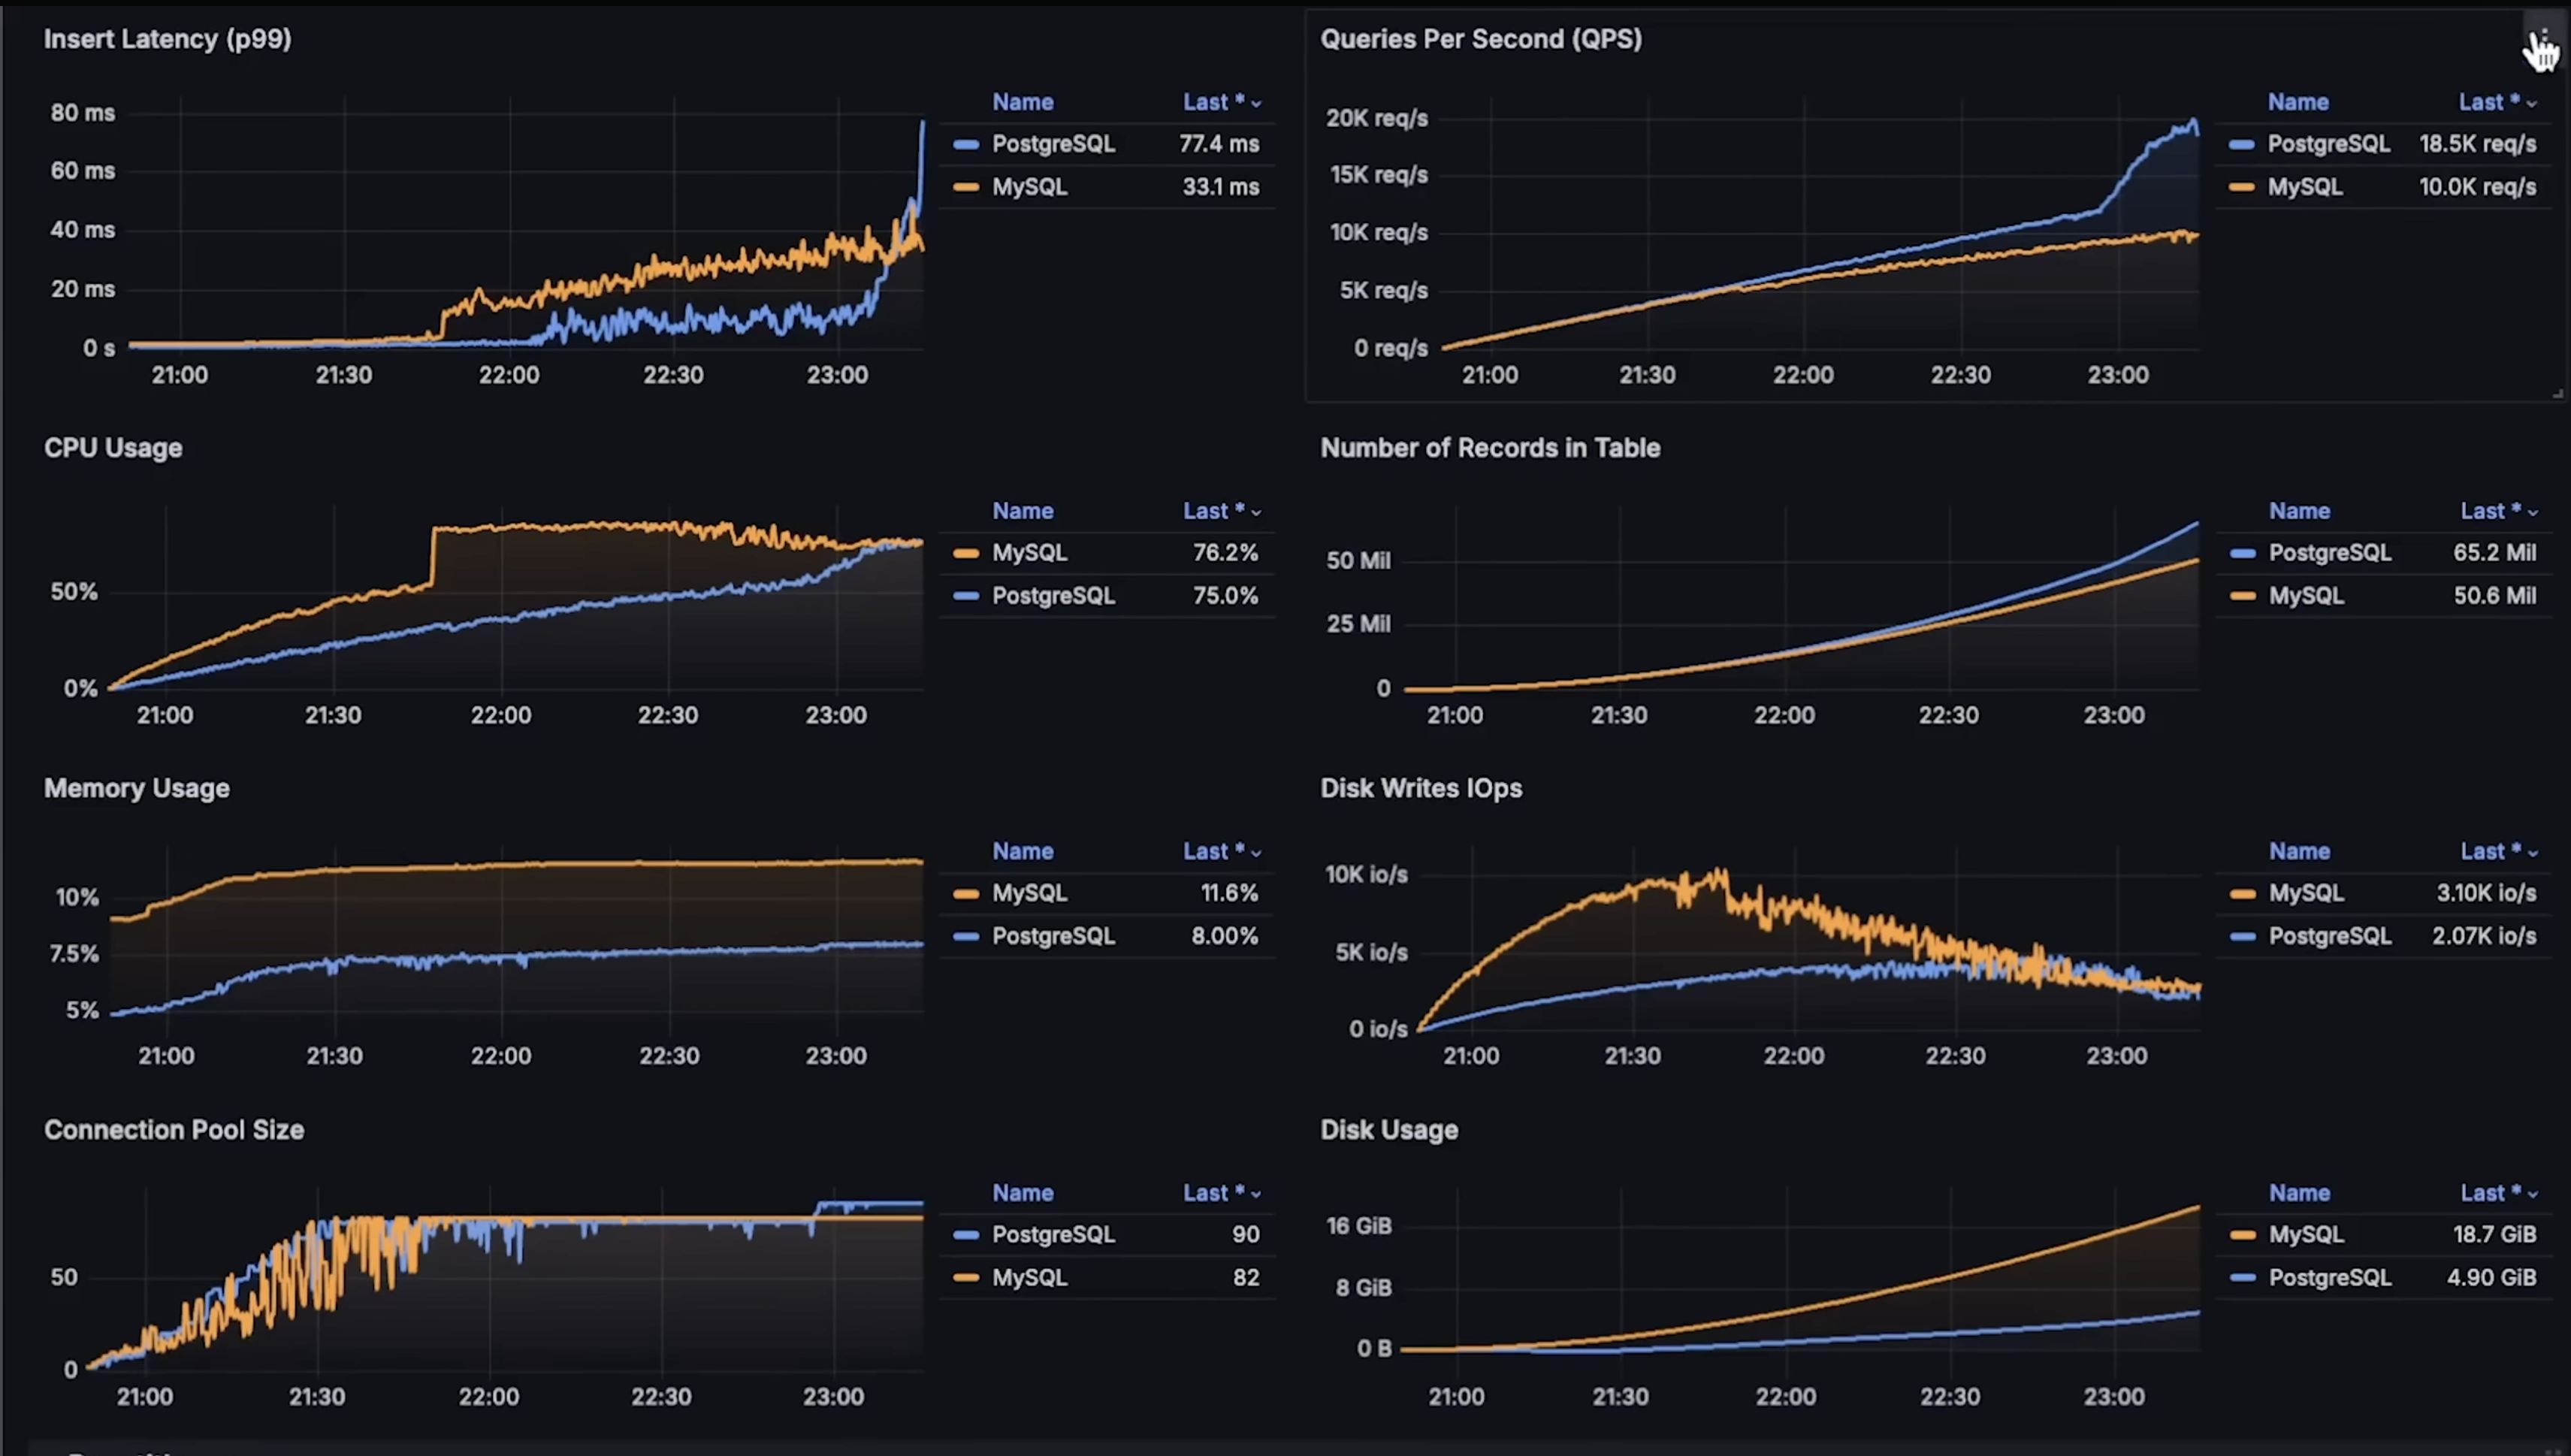
PostgresSQL vs Mysql Benchmarks
A greate video by Anton Putra called MySQL vs PostgreSQL Performance Benchmark.
First Benchmark overview (INSERT, SELECT)
Second Benchmark overview (Read Latency, Finding a Record and Joining Tables)
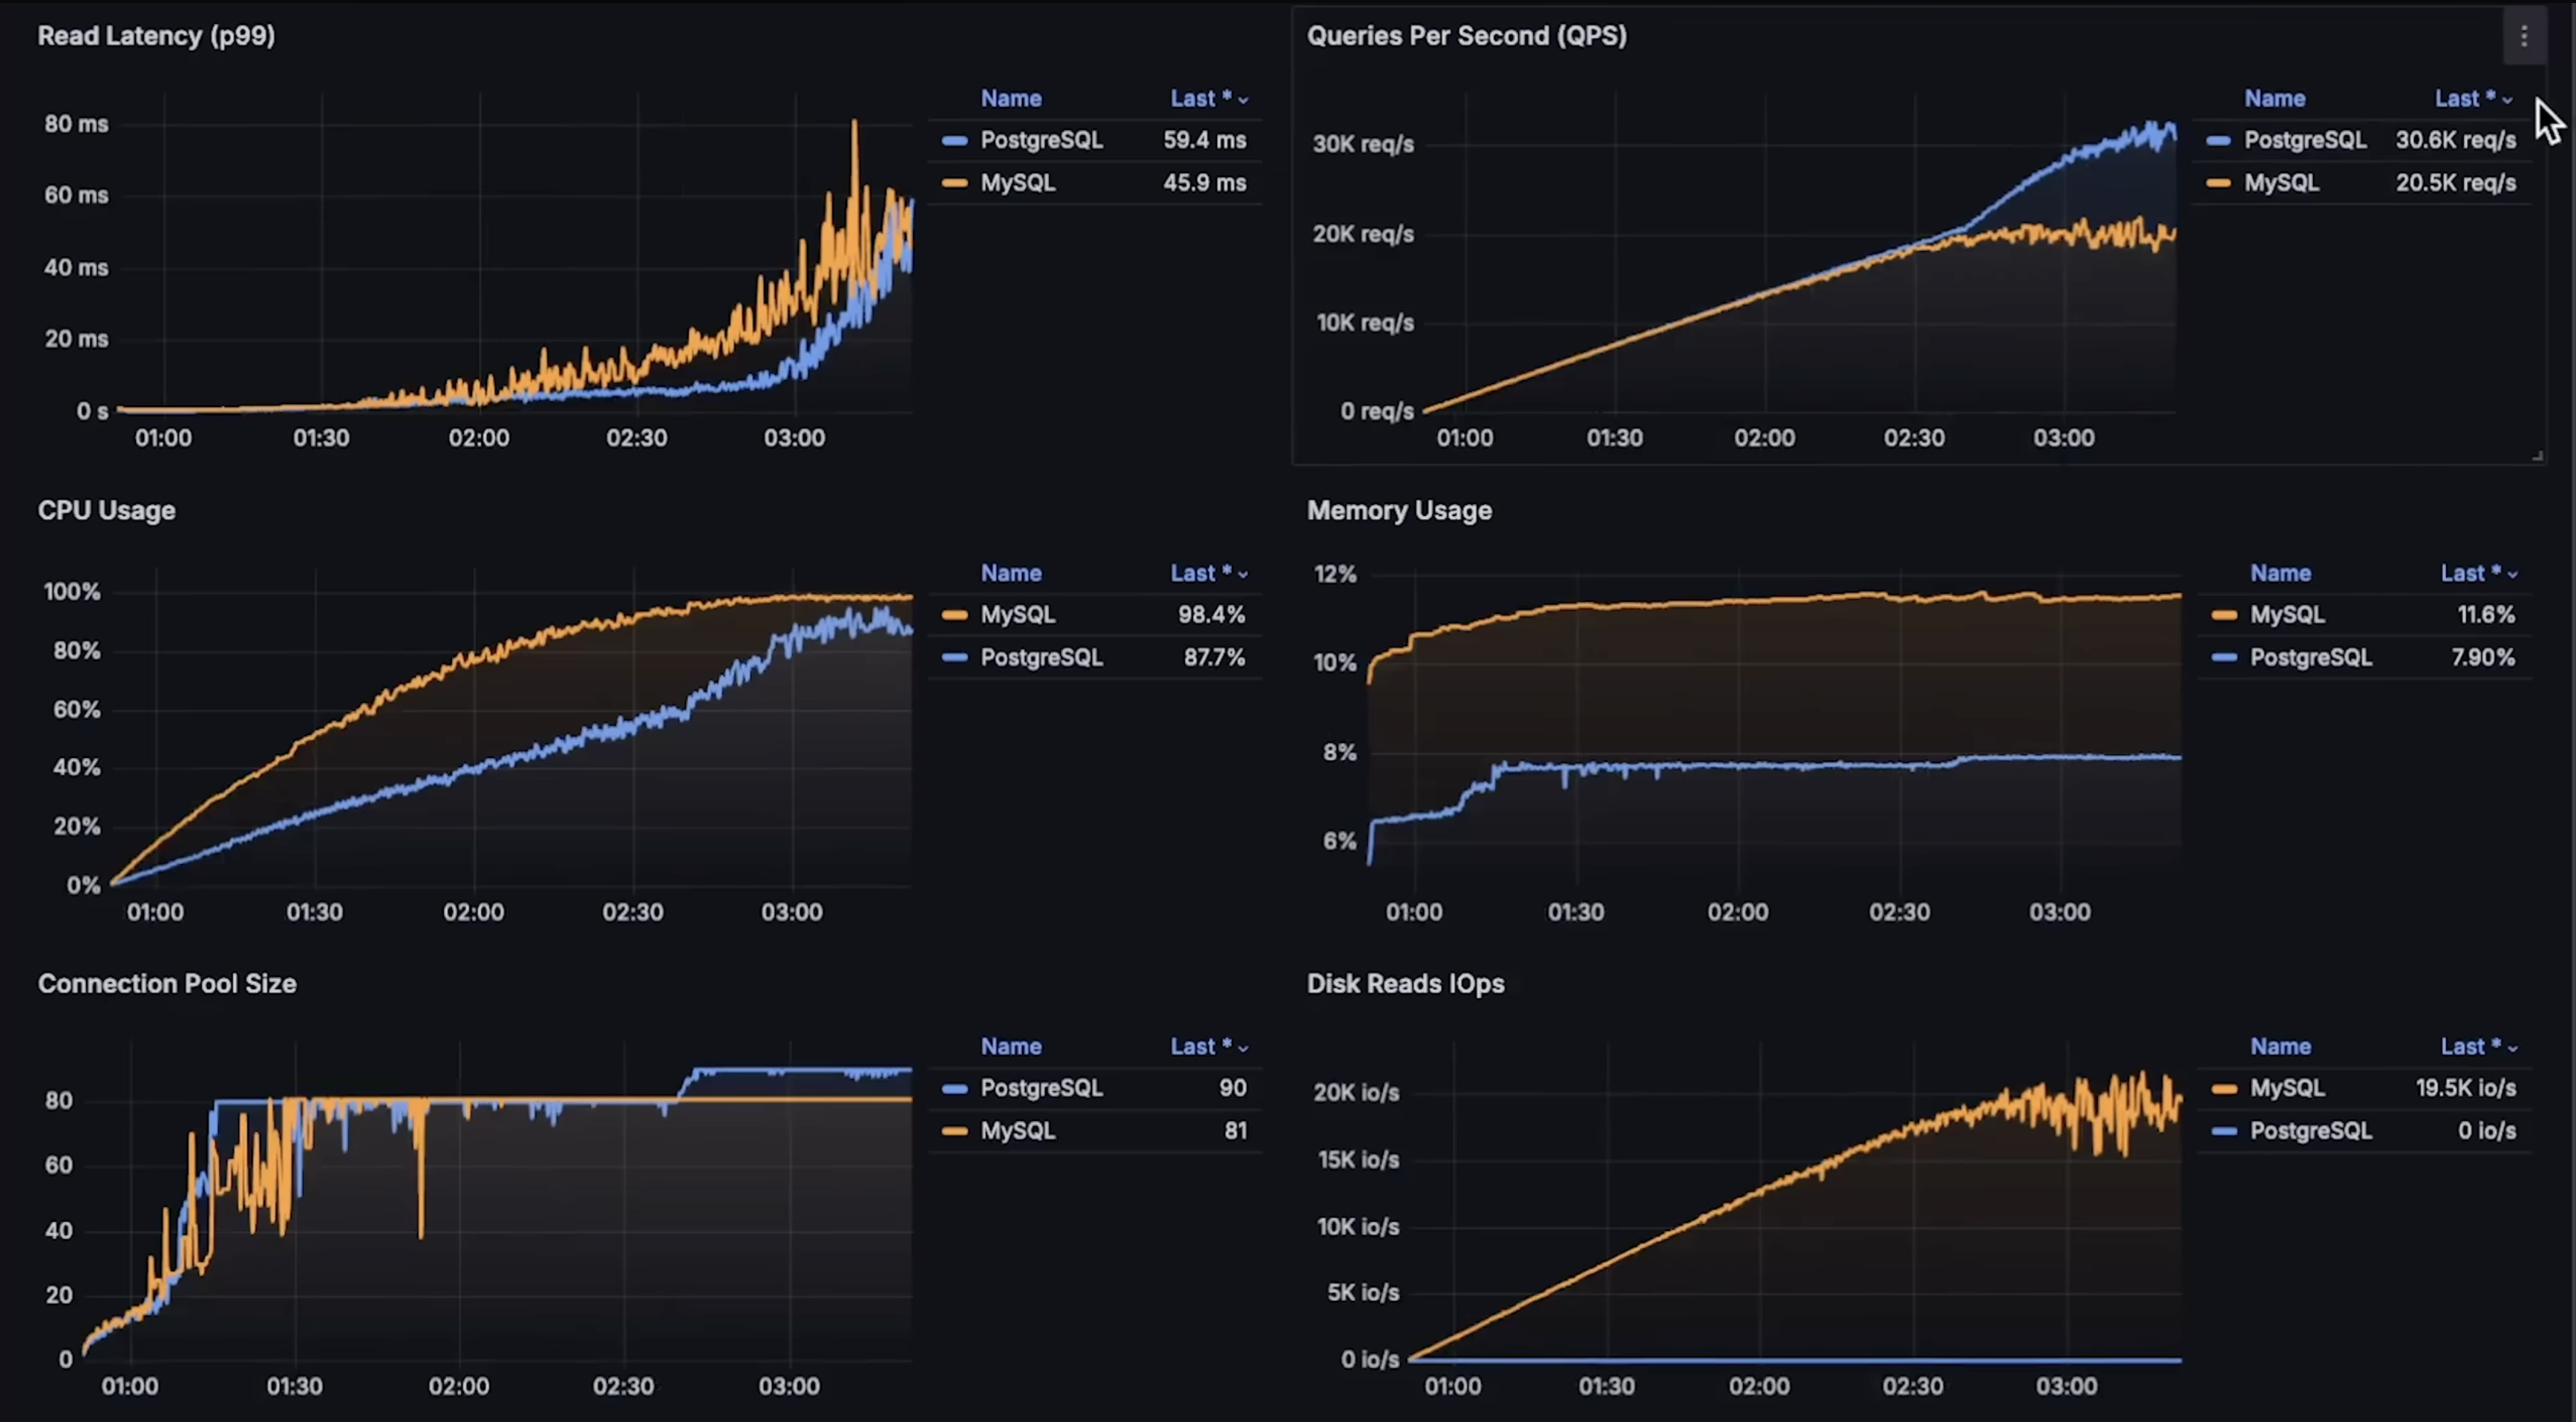
to see each graph details please see the Anton Putra video.
5. Logging Security and Strategies
based on this beautiful article these are the Logging Security and Strategies:
-
Establish Clear Logging Objectives
-
Decide why you are logging: what problems or goals are you trying to track.
-
Decide what to log: don’t try to log everything.
-
Make logs useful: for errors, include the error and the events leading up to it so issues can be fixed quickly.
-
-
Do use log levels correctly
-
Here's a summary of common levels and how they're typically used:
INFO: noteworthy business events.WARN: Abnormal situations that may indicate future problems.ERROR: errors that affect a specific operation.FATAL: errors that affect the entire program.
-
-
Do write meaningful log entries
-
Here's an example of a log entry without sufficient context:
{
  "timestamp": "2023-11-06T14:52:43.123Z",
  "level": "INFO",
  "message": "Login attempt failed"
}
And here's one with just enough details to piece together who performed the action, why the failure occurred, and other meaningful contextual data.
{
  "timestamp": "2023-11-06T14:52:43.123Z",
  "level": "INFO",
  "message": "Login attempt failed due to incorrect password",
  "user_id": "12345",
  "source_ip": "192.168.1.25",
  "attempt_num": 3,
  "request_id": "xyz-request-456",
  "service": "user-authentication",
  "device_info": "iPhone 12; iOS 16.1",
  "location": "New York, NY"
}
-
-
Protect Logs and Sensitive Information
- The mishandling of sensitive information in logs can have severe repercussions, as exemplified by the incidents at Twitter and GitHub in 2018.
-
Do not log sensitive data: passwords, API tokens, session tokens, credit card numbers, Social Security numbers, personal emails, etc.
-
Log references or IDs instead: for example, log a user ID instead of the email or password.
-
Example: Instead of logging the full password:
-
{ "userId": "user-123", "password": "********" }
-
- log only the user ID to identify the record:
-
{ "userId": "user-123", "action": "login_failed" }
-
6. Processing Tasks with BullMQ in NestJS
We need to perform background tasks, like sending prayer time notifications for example. BullMQ lets you offload work to a worker process so your main server stays responsive.
How the Process Works
1. A job is created (produced)
-
Your NestJS server decides that a task needs to happen (e.g., notify a user).
-
You add the job to a queue:
await this.prayerQueue.add('notify', { userId: 'user-123', prayerName: 'Fajr', time: '05:30', });2. The job waits in the queue
-
Jobs remain in the queue until a worker process is ready to process them.
-
This ensures the main server is never blocked, even if many jobs are created at once.
3. Single Worker Picks Up the Job
-
A worker process subscribes to the queue and executes jobs asynchronously:
-
@Processor('prayerQueue') export class PrayerProcessor extends WorkerHost { async process(job: Job) { const { userId, prayerName, time } = job.data; console.log(`Sending prayer notification to ${userId}: ${prayerName} at ${time}`); // Push notification logic here } } - Each job is processed independently, without blocking the main Node.js event loop.
4. Job Completion
-
Once the worker finishes, BullMQ marks the job as completed in Redis.
-
Failed jobs can retry automatically based on configuration.
Single-Worker Approach
-
The worker runs in the same server process as your main NestJS application.
-
This setup is simple and easy to implement, and is fine for low to moderate workloads.
Limitation:
-
If thousands of jobs arrive at once or jobs are heavy (CPU-intensive tasks, multiple API calls), a single worker can become a bottleneck.
-
Even though Node.js is non-blocking for I/O, the worker still handles jobs one at a time by default, and processing may take longer if overloaded.
Scaling with Multiple Workers
-
To handle high volumes of jobs, you can run additional worker processes On separate servers or containers.
-
BullMQ automatically distributes jobs across all workers connected to the same queue.
-
If 200k jobs are queued, each worker pulls jobs one by one, balancing the workload.
-
This ensures the main server remains responsive and all jobs are processed efficiently.
-
-
We can have:
-
Main NestJS server
-
Handles HTTP requests
-
Adds jobs to the queue
-
Optionally runs a worker for background tasks
-
-
Separate Worker server/process
-
Connects to the same queue in Redis
-
Processes jobs independently
-
-
Example with multiple workers:
- Main Server (with optional worker)
-
// app.module.ts import { Module } from '@nestjs/common'; import { BullModule } from '@nestjs/bullmq'; import { PrayerProcessor1 } from './prayer.processor'; import { PrayerService } from './prayer.service'; @Module({ imports: [ BullModule.forRoot({ connection: { host: 'localhost', port: 6379 }, }), BullModule.registerQueue({ name: 'prayerQueue' }), ], providers: [PrayerService, PrayerProcessor1], }) export class AppModule {} -
// prayer.processor.ts (Worker on main server) import { Processor, WorkerHost } from '@nestjs/bullmq'; import { Job } from 'bullmq'; @Processor('prayerQueue') export class PrayerProcessor1 extends WorkerHost { async process(job: Job) { console.log(`[Worker1 - Main Server] Notify ${job.data.userId}: ${job.data.prayerName}`); } } -
// prayer.service.ts (Job producer) import { Injectable } from '@nestjs/common'; import { InjectQueue } from '@nestjs/bullmq'; import { Queue } from 'bullmq'; @Injectable() export class PrayerService { constructor(@InjectQueue('prayerQueue') private prayerQueue: Queue) {} async scheduleNotification(userId: string, prayerName: string, time: string) { await this.prayerQueue.add('notify', { userId, prayerName, time }); } } - Separate Worker Server (runs only the worker):
-
This server has no HTTP API, just listens to the queue and processes jobs.
-
// worker-server.ts
import { NestFactory } from '@nestjs/core';
import { Module } from '@nestjs/common';
import { BullModule, Processor, WorkerHost } from '@nestjs/bullmq';
import { Job } from 'bullmq';

@Processor('prayerQueue')
class PrayerProcessor2 extends WorkerHost {
  async process(job: Job) {
    console.log(`[Worker2 - Separate Server] Notify ${job.data.userId}: ${job.data.prayerName}`);
  }
}

@Module({
  imports: [
    BullModule.forRoot({ connection: { host: 'localhost', port: 6379 } }),
    BullModule.registerQueue({ name: 'prayerQueue' }),
  ],
  providers: [PrayerProcessor2],
})
class WorkerModule {}

async function bootstrap() {
  const app = await NestFactory.createApplicationContext(WorkerModule);
  console.log('Worker server started and listening to prayerQueue');
}
bootstrap();
-
-
Both workers connect to the same Redis-backed queue.
-
BullMQ assigns jobs dynamically so no two workers process the same job, and processing is parallelized.
Job Flow
-
Main server receives a request to schedule a notification.
-
It adds a job to
prayerQueuein Redis. -
BullMQ distributes the job to any available worker:
-
Worker1(on main server) -
Worker2(on separate server/process)
-
-
Each job is executed only once, even if multiple workers are running concurrently.
Key Points
-
Single worker: simple, easy, good for small workloads.
-
Limitation: can become a bottleneck for heavy or high-volume tasks.
-
Multiple workers: scale horizontally; jobs are automatically distributed across workers.
-
Main NestJS server remains free to handle requests.
-
Jobs are stored persistently in Redis until processed.
-
Failed jobs can retry automatically, ensuring reliability.
7. OneSignal or Expo
Features & SDK Support
Expo
-
Designed mainly for React Native apps using Expo.
-
Handles communication with APNs (Apple) and FCM (Firebase) automatically.
-
Limited to the Expo ecosystem.
OneSignal
-
Supports many platforms: React Native, Expo, Unity, Cordova, Ionic, Capacitor, PhoneGap.
-
Cross-platform and not tied to a specific framework.
-
Built for large-scale and multi-channel messaging.
Conclusion here:
Expo is simpler but more limited. OneSignal is more flexible and enterprise-ready.
Pricing
Onesignal
-
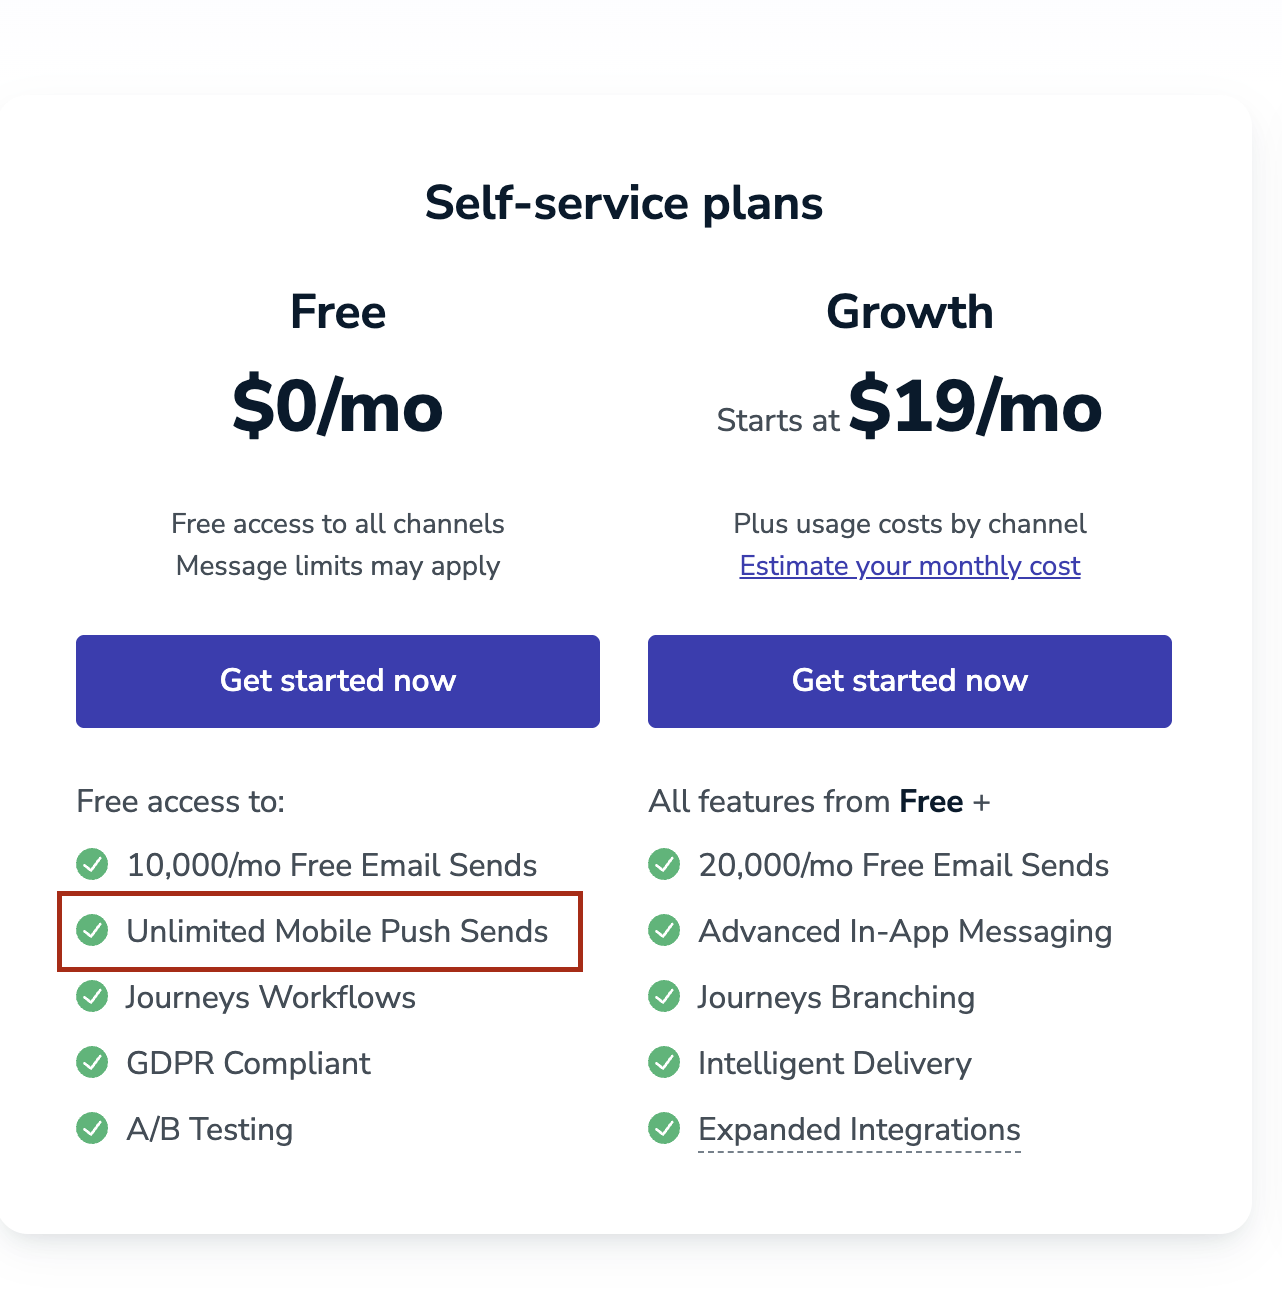
OneSignal mobile push notifications are free and unlimited for:
-
iOS
-
Android
-
-
You only pay if you use advanced features, such as:
-
Email, SMS, or other omnichannel messaging
-
Advanced automation and analytics
-
Enterprise support
-
Expo
-
Expo Push Notifications are free to use.
Pros & Cons
Expo
- Pros
-
Very easy to implement.
-
Handles native device details automatically.
-
Ideal for fast development.
-
- Cons
-
Only works if your app is built with Expo.
-
Limited advanced features.
-
Less suitable for very large-scale systems.
-
- When to use Expo
-
Small to medium apps.
-
MVPs or early-stage products.
-
Teams already using Expo and wanting simplicity.
-
OneSignal
- Pros
-
Easy integration despite being more powerful.
-
Supports massive scale (millions of notifications).
-
Strong documentation.
-
Omnichannel support (push, email, SMS, etc.).
-
- Cons
-
Dashboard and features can feel complex at first.
-
Advanced features may require paid plans.
-
Support mainly in English.
-
-
When to use OneSignal
-
Large user base.
-
High-volume notifications.
-
Need segmentation, analytics, and reliability at scale.
-
Conclusion
Based on our requirements, OneSignal is the best choice for our push notification system. In our case, we will use push notifications only for Android and iOS mobile devices, and for this use case, OneSignal provides mobile push notifications for free with no sending limits.
8. Versioning Strategy
API Versioning Strategies Comparison
Chosen Approach: URL-Based API Versioning
We will version our APIs using the URL path, for example:
/api/v1/prayer-times
/api/v2/prayer-times| Strategy | How it Works | Pros | Cons |
|---|---|---|---|
| URI Versioning | The version is part of the URL path (e.g., /api/v1/users). |
Very easy to use and test; clear and readable; works perfectly with mobile apps; widely used in real-world APIs. | URLs become longer |
| Header Versioning | The version is sent in a custom HTTP header (e.g., X-API-Version: 1). |
Keeps URLs clean; allows one endpoint for multiple versions. | Harder to debug; mobile clients must always send the correct header; mistakes can break requests. |
| Media Type Versioning | The version is included in the Accept header (e.g., application/vnd.myapi.v1+json). |
Follows strict REST principles (URL represents the resource, header describe how the resource is represented); very flexible. | Complex to implement and understand; difficult for mobile apps; overkill for most projects. |
| Query Parameter Versioning | The version is passed as a query parameter (e.g., /users?v=1). |
Simple to implement; easy to test. | easy to misuse; looks like optional data instead of a contract; not recommended for long-term APIs. |
| Custom Versioning | Custom logic extracts the version from any part of the request. | Maximum flexibility for special cases. | High complexity; harder to maintain; easy to introduce bugs; rarely needed. |
This strategy was chosen after comparing it with header-based and query-parameter versioning.
Why URL Versioning Is the Best Choice
-
Easy for frontend, mobile, and third-party consumers to understand
-
No hidden headers or implicit behavior
-
Logs, monitoring, and debugging clearly show which version is being used
-
Works with all HTTP clients (browsers, mobile SDKs, curl, Postman)
-
No special configuration required
-
Easy to test manually
- real-world companies use URI versioning in production APIs. (eg. Salesforce, Stripe...)
- examples using Salesforce and Stripe APIs:
-
curl https://api.stripe.com/v1/charges \
  -u sk_test_BQokikJOvBiI2HlWgH4olfQ2:

curl "https://api.salesforce.com/einstein/ai-agent/v1/agents/{id}/sessions" \
  ...
-
- examples using Salesforce and Stripe APIs:
9. Sentry
Sentry is an error monitoring and crash reporting tool for both web and mobile applications. It captures:
-
Runtime errors
-
Unhandled exceptions
-
Performance issues
Integration:
-
React Native / Expo:
@sentry/react-native
Plans:
- visit: https://sentry.io/pricing/
10. Styling
Theme Architecture
All design tokens are centralized in a single theme object exported from @/src/theme and it is based on Saheb Figma Design System:
import { theme } from '@/src/theme';

// Colors
theme.colors.primary[400]
theme.colors.text.primary

// Typography
theme.typography.heading
theme.typography.bodyB2

// Spacing
theme.spacing.xl
theme.spacing.md

// Border Radius
theme.radius.lg
theme.radius['2xl']
Color System
export const Colors = {
  light: {
    primary: { 100: '#bfd6e5', 200: '#80adcb', 300: '#4085b2', 400: '#005c98', 500: '#004572' },
    secondary: { 100: '#00ffff', 200: '#02d7d7', 300: '#02a9a9', 400: '#1b9bd8', 500: '#0c74bb' },
    neutral: { 100: '#ffffff', 200: '#e8e8e8', 300: '#d2d2d2', ..., 1000: '#333333' },
    text: { primary: '#0a0a0a', secondary: '#6a7282', tertiary: '#9ca3af', inverse: '#ffffff', placeholder: '#d1d5db' },
    background: { primary: '#ffffff', secondary: '#f9fafb' },
    border: { default: '#e5e7eb', light: '#f3f4f6', dark: '#d1d5db', focused: '#005c98' },
    // ... semantic colors (red, yellow, green)
  }
}
Typography
export const Typography = {
  heading: { fontFamily: Fonts.cairo.bold, fontSize: 24, lineHeight: 32 },
  sectionTitle: { fontFamily: Fonts.cairo.semiBold, fontSize: 18, lineHeight: 24 },
  bodyB2: { fontFamily: Fonts.cairo.black, fontSize: 16, lineHeight: 22 },
  bodyB3: { fontFamily: Fonts.cairo.regular, fontSize: 14, lineHeight: 20 },
  bodyB4: { fontFamily: Fonts.cairo.black, fontSize: 12, lineHeight: 20 },
  bodyB5: { fontFamily: Fonts.cairo.medium, fontSize: 14, lineHeight: 20 },
  button: { fontFamily: Fonts.cairo.bold, fontSize: 16, lineHeight: 24 },
  buttonSecondary: { fontFamily: Fonts.cairo.medium, fontSize: 16, lineHeight: 24 },
  caption: { fontFamily: Fonts.inter.regular, fontSize: 12, lineHeight: 16 },
  small: { fontFamily: Fonts.inter.regular, fontSize: 11, lineHeight: 16 },
  tiny: { fontFamily: Fonts.cairo.regular, fontSize: 10, lineHeight: 14 },
}
Spacing System
export const spacing = {
  none: 0,
  xs: 2,      // 2px
  sm: 4,      // 4px
  md: 8,      // 8px
  lg: 12,     // 12px
  xl: 16,     // 16px
  '2xl': 20,  // 20px
  '3xl': 24,  // 24px
  '4xl': 32,  // 32px
  '5xl': 40,  // 40px
  '6xl': 48,  // 48px
  '7xl': 56,  // 56px
} as const;
Border Radius
export const radius = {
  none: 0,
  xs: 2,      // 2px
  sm: 4,      // 4px
  md: 6,      // 6px
  lg: 8,      // 8px
  xl: 10,     // 10px
  '2xl': 12,  // 12px
  '3xl': 16,  // 16px
  full: 9999, // Circular
} as const;