Application Saheb Development Plan

Purpose of This Documentation
This presentation explains the design and technical decisions behind our application features.
I will be covering:
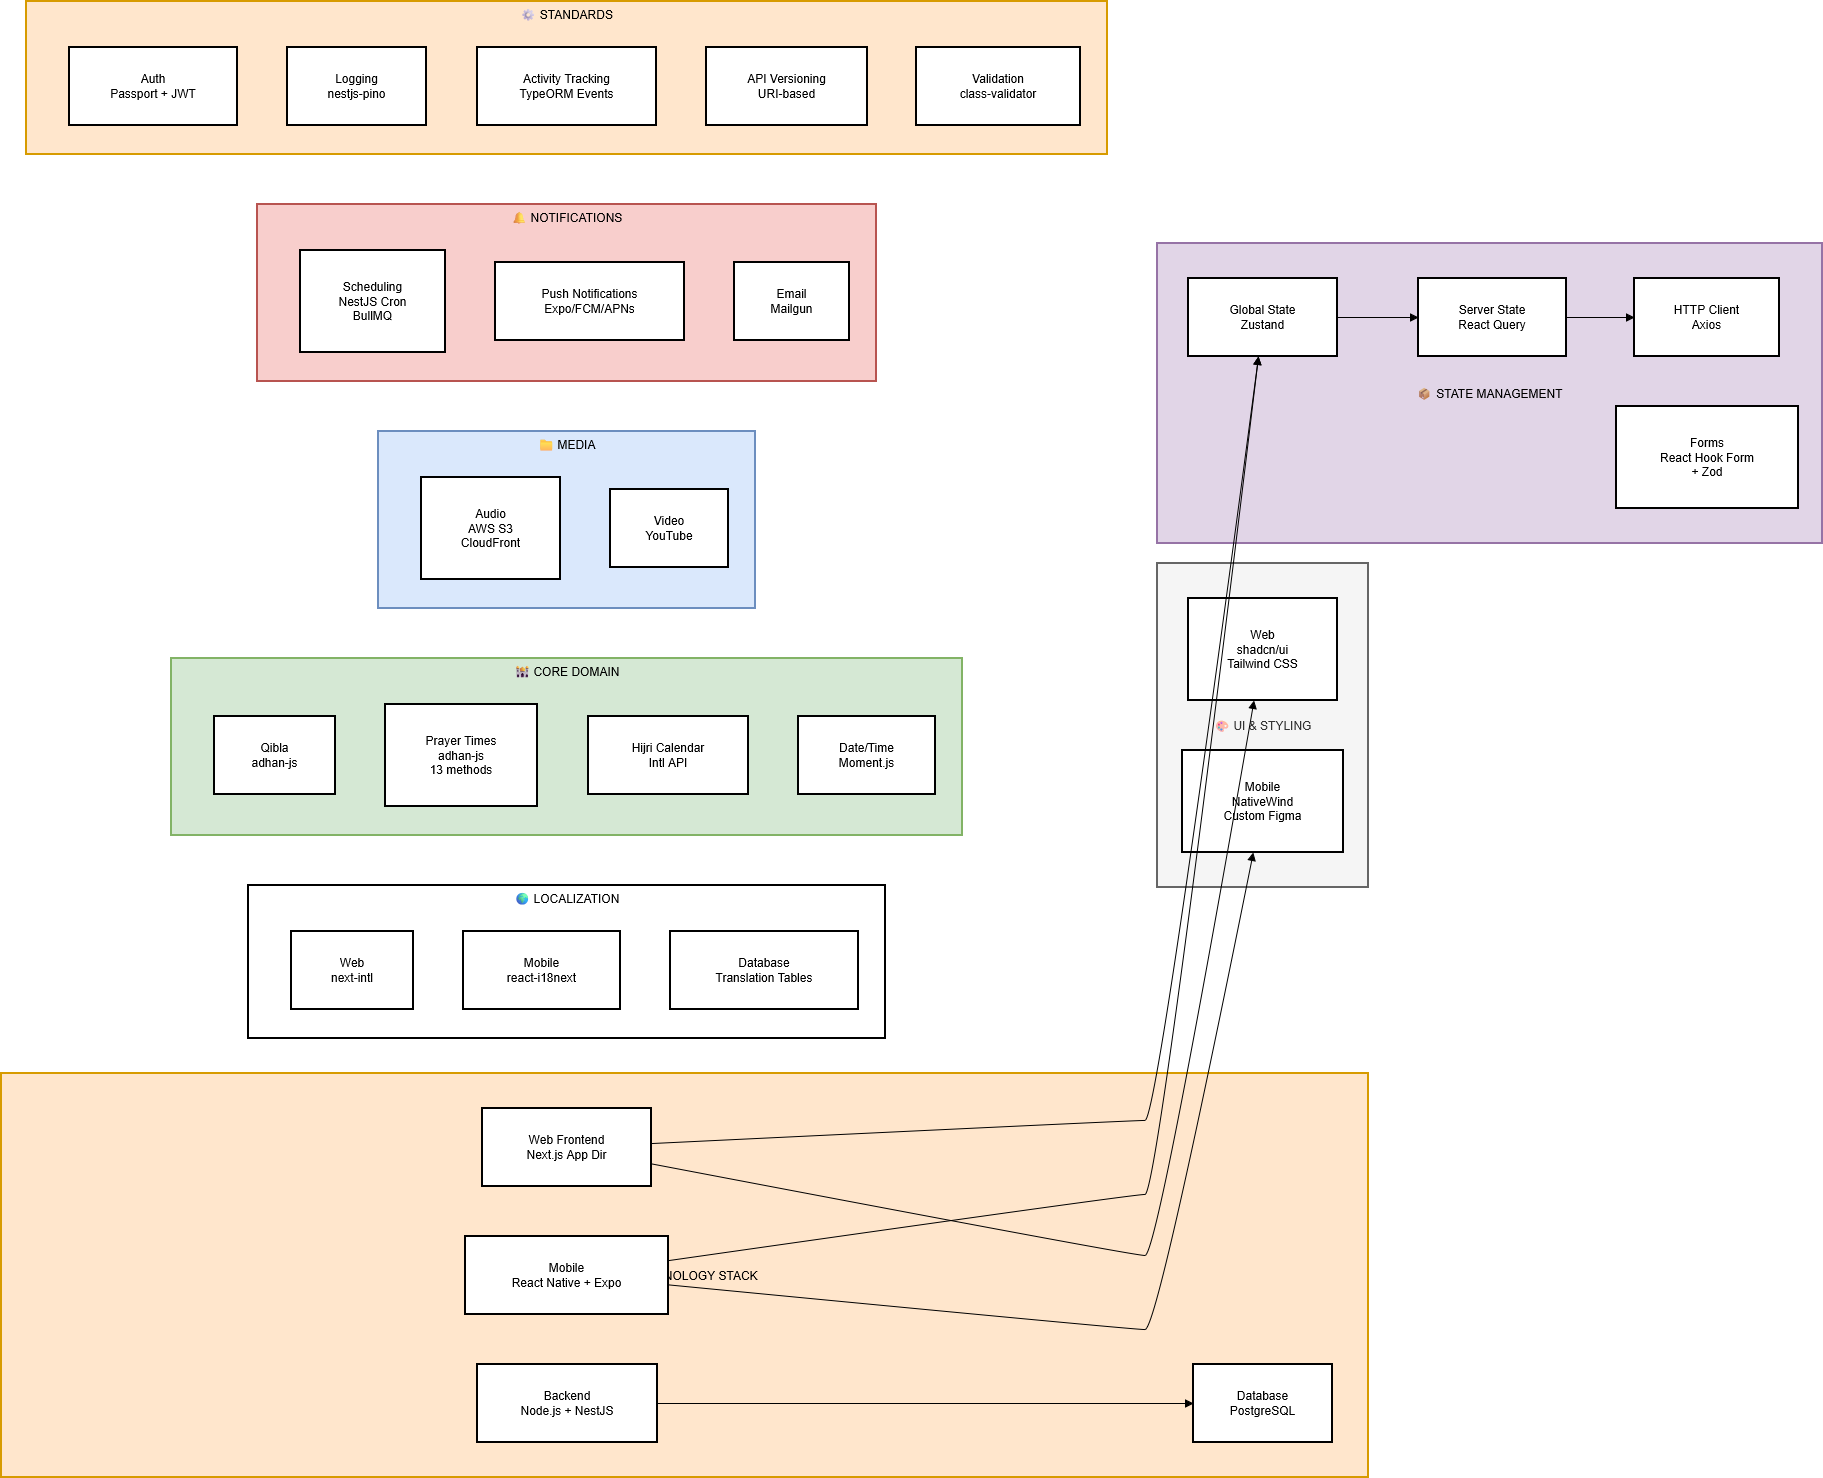
1. Technology Stack
-
Backend framework
-
Web frontend framework
-
Mobile frontend framework
-
Database technology (PostgreSQL, MySQL, etc.)
-
UI libraries
-
Supporting libraries and tools (date manipulation library, state management, datafetching, utilities)
2. Project Structure
-
Backend folder structure
-
Frontend folder structure
- Mobile folder structure
3. Language Support
-
Multi-language database translation strategy
-
App language and RTL (Right-to-Left) support on web and mobile
4. Core Domain Logic
- Qibla calculation logic
- Prayer time calculation methods
- Hijri time caulculation methods
5. Media Management
-
Audio resource handling (Sermon / موعظة)
-
Video hosting and streaming strategy
6. Notifications & Communication
- Scheduling notificaiton
-
Timezone-aware push notification system
-
Email notification
7. Application Standards
- Authentication and Authorization
-
Request logging
-
User event and activity tracking
-
API versioning
- File Upload handling
- Data Validation
How Each Section Is Documented
For every section in this documentation, I consistently answer the following questions:
-
What solution did I choose?
-
Why did I choose this solution?
-
I may cover what are the pros and cons of the solution for critical sections?
-
What alternative approaches I considered?
- We may also answer questions related to a specific question
1. Technology Stack
a. Backend Framework
What solution did I choose?
I chose Nodejs + Expressjs + NestJS as the backend framework.
Why did I choose this solution?
- Team is more experienced with
- Widely used on our code base
-
Built with TypeScript by default
Pros
-
Clear module-based architecture
-
Strong TypeScript support
-
Easy integration with databases, authentication, and queues
-
Express Rich community
-
Supports modular development and scalability
-
Fits well for APIs serving web and mobile apps
-
One backend server for both mobile and web
Cons
-
Slightly more boilerplate
-
Integration Complexity with Some Legacy Libraries
Alternative Approaches
-
Express.js
-
Fastify
-
Laravel (PHP)
-
Spring Boot (Java)
b. Web Frontend Framework
What solution did I choose?
I chose Next.js using the App Directory.
Why did I choose this solution?
-
Built-in support for modern React features
-
File-based routing with the App Directory
-
Good integration with backend APIs
- Built-in layouts, and loading states, server errors handlings
Pros
-
Clear and scalable project structure
-
Server-side rendering and static generation
-
Strong support for SEO and web performance
-
Server Components
Cons
-
Some ecosystem libraries are still adapting
-
Build & Deployment Complexity
-
Rapidly Changing Features
Alternative Approaches
-
React ( Vite )
-
React (Tanstack start )
-
Nuxt.js
-
Angular
c. Mobile Frontend Framework
What solution did I choose?
I chose React Native with Expo.
Why did I choose this solution?
-
Allows building iOS Android apps and web from a single codebase
- Quick testing on simulators, emulators, and real devices
-
Built-in support for push notifications, sensors, and device APIs
-
Large community and ecosystem
- Deployment built-in (EAS Hosting)
- Routing and Authentification built in
- Assets management
- AI intergration (expo mcp server)
Cons
-
Some native modules require custom development (Ejecting from Expo)
Alternative Approaches
-
Pure React Native (without Expo)
-
Flutter
-
Native iOS (Swift) / Android (Kotlin) development
d. Database Technology
What solution did I choose?
I chose PostgreSQL as the database for our application.
Why did I choose this solution?
- Team is more experienced with
- Good ecosystem and tooling support
-
Reliable and stable relational database
-
Widely used in the industry with large community and resources
-
Works well with TypeORM for Nestjs integration
Pros
-
Open-source and actively maintained
-
Supports advanced features like JSON, full-text search, and indexes
Cons
-
Can be more complex to set up than simpler databases (like SQLite)
-
Overkill for very small projects
e. UI Libraries
1. Web Frontend UI Approach
What solution did I choose?
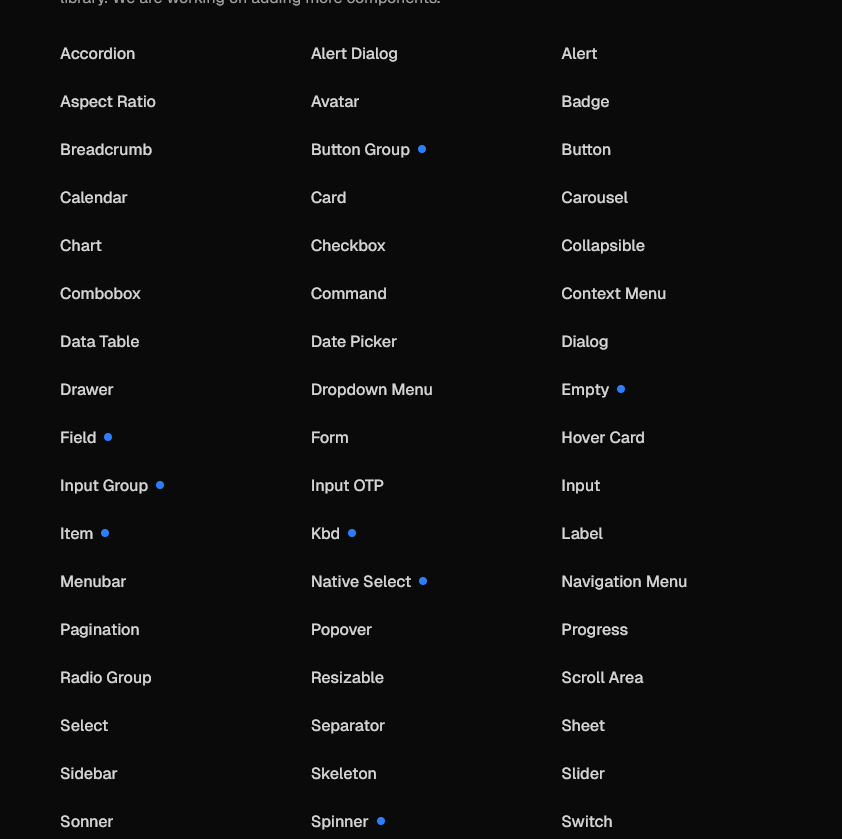
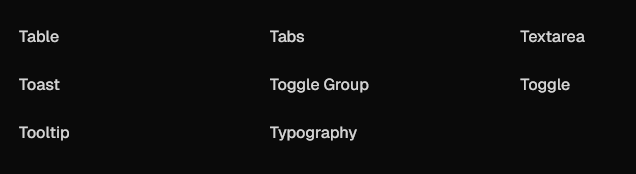
I chose shadcn/ui integrated with Tailwind CSS, and Figma designs for reference.
Why did I choose this solution?
- Tailwind provide CSS utility classes to speed up development, so instead of writing custom CSS files, I can style components directly using small, reusable classes
- Without Tailwind (Traditional CSS):
- With Tailwind:
- Without Tailwind (Traditional CSS):
-
Provides a ready-to-use component library built on Tailwind CSS
- Open Code: The top layer of your component code is open for modification:
- Other UI libraries:
- Shadcn:
-
import * as React from "react"
import { Slot } from "@radix-ui/react-slot"
import { cva, type VariantProps } from "class-variance-authority"

import { cn } from "@/lib/utils"

const buttonVariants = cva(
  "inline-flex items-center justify-center gap-2 whitespace-nowrap rounded-md text-sm font-medium transition-all disabled:pointer-events-none disabled:opacity-50 [&_svg]:pointer-events-none [&_svg:not([class*='size-'])]:size-4 shrink-0 [&_svg]:shrink-0 outline-none focus-visible:border-ring focus-visible:ring-ring/50 focus-visible:ring-[3px] aria-invalid:ring-destructive/20 dark:aria-invalid:ring-destructive/40 aria-invalid:border-destructive",
  {
    variants: {
      variant: {
        default: "bg-primary text-primary-foreground hover:bg-primary/90",
        destructive:
          "bg-destructive text-white hover:bg-destructive/90 focus-visible:ring-destructive/20 dark:focus-visible:ring-destructive/40 dark:bg-destructive/60",
        outline:
          "border bg-background shadow-xs hover:bg-accent hover:text-accent-foreground dark:bg-input/30 dark:border-input dark:hover:bg-input/50",
        secondary:
          "bg-secondary text-secondary-foreground hover:bg-secondary/80",
        ghost:
          "hover:bg-accent hover:text-accent-foreground dark:hover:bg-accent/50",
        link: "text-primary underline-offset-4 hover:underline",
      },
      size: {
        default: "h-9 px-4 py-2 has-[>svg]:px-3",
        sm: "h-8 rounded-md gap-1.5 px-3 has-[>svg]:px-2.5",
        lg: "h-10 rounded-md px-6 has-[>svg]:px-4",
        icon: "size-9",
        "icon-sm": "size-8",
        "icon-lg": "size-10",
      },
    },
    defaultVariants: {
      variant: "default",
      size: "default",
    },
  }
)

function Button({
  className,
  variant = "default",
  size = "default",
  asChild = false,
  ...props
}: React.ComponentProps<"button"> &
  VariantProps<typeof buttonVariants> & {
    asChild?: boolean
  }) {
  const Comp = asChild ? Slot : "button"

  return (
    <Comp
      data-slot="button"
      data-variant={variant}
      data-size={size}
      className={cn(buttonVariants({ variant, size, className }))}
      {...props}
    />
  )
}

export { Button, buttonVariants }
-
- Distribution: A flat-file schema and command-line tool make it easy to distribute components.
-
npx shadcn@latest add button
-
- AI-Ready: Open code for LLMs to read, understand, and improve (mcp server).
-
{
  "registries": {
    "@acme": "https://acme.com/r/{name}.json"
  }
}
-
-
Figma designs give a visual reference for UI consistency
- Huge ecosystem built around shadcn.
-
Fits well with React and Next.js
- Very customizable :
- you can change the whole app theme by changing only globall.css file :
- change component source code.
Pros
-
Lightweight and modern styling approach
Cons
-
Learning curve for Tailwind if new to utility-first CSS
Alternative Approaches
-
Material-UI (MUI)
-
Ant Design
-
Chakra UI
-
Custom components from scratch
1. Mobile UI Approach:
What solution did I choose?
I chose not to use any mobile component library.
I use NativeWind for styling, along with Figma MCP, Figma Make, and Figma Dev Tools.
Why did I choose this solution?
- The app uses a fully custom UI designed in Figma, so prebuilt component libraries are not a good fit
-
NativeWind works like Tailwind CSS, making styling simple and consistent
-
Utility-based styling works well with LLMs for generating and adjusting UI code
-
Figma MCP and Figma Make help convert design decisions into implementation guidance
-
Figma Dev Tools allow developers and LLMs to inspect spacing, colors, and layout accurately
- NativeWind allows theme-based styling (colors, spacing, dark mode)
Cons
-
No ready-made components out of the box
-
More manual work during initial development
f. Supporting Libraries & Tools
Zustand (State Management)
What solution did I choose?
I chose Zustand for global state management.
Why did I choose this solution?
-
Simple and lightweight API
-
Minimal boilerplate compared to other state managers
-
Works well with React and React Native
Alternative Approaches
-
Redux Toolkit
-
Jotai
React Query (Server State & Data Fetching)
What solution did I choose?
I chose React Query for data fetching and server state management.
Why did I choose this solution?
-
Handles caching, loading, and error states automatically
- provide all request states by default (
isPending, isError, isFetching , isLoadin,isFetching) -
.Reduces manual API state handling
-
Works well with REST APIs
-
Improves app performance
-
Simplifies async data logic
Alternative Approaches
-
SWR
-
Manual data fetching
-
Redux Toolkit Query
Axios (HTTP Client)
What solution did I choose?
I chose Axios for making HTTP requests.
Why did I choose this solution?
-
Simple API
-
Supports request and response interceptors. (eg for handling access tokens and refresh tokens)
-
Works well with authentication and error handling
Alternative Approaches
-
Native fetch API
-
Ky
Postman (API Testing)
What solution did I choose?
I chose Postman for API testing and debugging.
Why did I choose this solution?
-
Easy to test APIs during development
- Easy to share requests and collections with the team
-
Supports environments and collections
- Postman is simpler and more familiar to the team
Alternative Approaches
-
Swagger
Why Postman Over Swagger:
-
Collaboration & Manual Collection Import
-
Easy to share requests and collections with the team
-
-
Environment Variables
-
Supports dev, staging, prod easily for testing
-
-
Ease of Use
-
Postman is simpler and more familiar to the team
-
- Swagger is mainly for documentation and simple API testing, while Postman is primarily for API testing and debugging
next-intl (Internationalization)
What solution did I choose?
I chose next-intl for internationalization in the web app.
Why did I choose this solution?
-
Designed specifically for Next.js
-
Supports server and client components
-
Easy locale-based routing
- Already using it in Irchademy
Alternative Approaches
-
react-i18next
React Hook Form + Zod (Forms & Validation)
What solution did I choose?
I chose React Hook Form with Zod for form handling and validation.
Why did I choose this solution?
-
Clean validation logic
- Works well with shadcn (shdacn support it by default)
-
Good developer experience
-
Schema-based validation
-
Strong TypeScript support
Alternative Approaches
-
Formik + Yup
-
Native form handling
Moment.js (Date & Time Handling)
What solution did I choose?
I chose Moment.js for handling and formatting dates and times.
Why did I choose this solution?
-
Simplifies date formatting and manipulation
-
Easy to use for common date operations
-
Widely known and documented
- Handles time zones and localization
- Large ecosystem and examples
Alternative Approaches
-
Day.js
-
date-fns
2. Application Architecture & Project Structure
a. Backend Folder Structure (NestJS)
What solution did I choose?
saheb-backend/
├── src/
│   ├── common/
│   │   ├── decorators/
│   │   │   ├── metadata/
│   │   │   │   ├── public.decorator.ts        # @Public decorator for public routes
│   │   │   │   └── roles.decorator.ts         # @Roles decorator for role-based access
│   │   │   └── requests/
│   │   │       └── current-user.decorator.ts  # @CurrentUser decorator to extract user from request
│   │   ├── entities/
│   │   │   └── base.entity.ts                 # Base entity with common fields
│   │   └── guards/
│   │       └── roles.guard.ts                 # Role-based authorization guard
│   ├── configs/
│   │   ├── database.config.ts                 # Database configuration
│   │   ├── jwt.config.ts                      # JWT configuration
│   │   ├── pino-logger.config.ts              # Logger configuration
│   │   └── throtttle.config.ts                # Rate limiting configuration
│   ├── modules/
│   │   ├── auth/
│   │   │   ├── dto/
│   │   │   │   └── auth.dto.ts                # Auth DTOs (login, register, etc.)
│   │   │   ├── guards/
│   │   │   │   └── access-token.guard.ts      # JWT access token guard
│   │   │   ├── strategies/
│   │   │   │   └── access-token.strategy.ts   # JWT access token strategy
│   │   │   ├── auth.controller.ts             # Auth endpoints (login, register, refresh)
│   │   │   ├── auth.service.ts                # Auth business logic
│   │   │   ├── auth.module.ts                 # Auth module definition
│   │   │   └── auth.constant.ts               # Auth constants
│   │   ├── users/                             # Users module
│   │   ├── app.controller.ts                  # Root controller
│   │   ├── app.service.ts                     # Root service
│   │   └── app.module.ts                      # Main application module
│   └── main.ts                                # Application entry point
├── .env.example                               # Environment variables template
Why did I choose this solution:
-
Keeps code organized by feature (config, modules, etc.)
-
Easy to maintain and scale
-
Follows NestJS best practices
b. Frontend Folder Structure (Next.js)
What solution did I choose?
saheb-frontend-skeleton/
├── src/
│   ├── app/
│   │   ├── (dashboard)/dashboard/
│   │   │   ├── page.tsx                   # for example: server component
│   │   │   └── _client.tsx               # for example: client component
│   │   └── login/
│   │       └── page.tsx                   # for example: login page
│   ├── components/
│   │   └── ui/button.tsx                  # for example: UI component
│   ├── i18n/
│   │   └── locales/en.json                # for example: English translations
│   ├── lib/
│   │   └── api-client.ts                  # for example: Axios setup
│   └── store/
│       └── auth.ts                        # for example: Zustand auth store
├── public/                                # Static assets
├── .env.example
├── Dockerfile
└── next.config.ts
Why did I choose this solution:
-
Make the page a server component by default
-
Allows running server-side logic before rendering the page
-
Useful for auth checks, data fetching, or redirection
-
C. Mobile Folder Structure (React Native + Expo)
─ assets/                        # Images, icons, fonts, etc.
─ scripts/                       # Build or helper scripts
─ src/
│   ├── app/                      # App entry points / pages
│   │   ├── _layout.tsx           # Main layout for all screens
│   │   ├── index.tsx             # Home page
│   │   ├── events.tsx            # Events page
│   │   └── settings.tsx          # Settings page
│   ├── components/               # Reusable UI components
│   │   ├── Table/
│   │   │   ├── Cell.tsx          # Example table cell
│   │   │   └── index.tsx
│   │   ├── BarChart.tsx
│   │   └── Button.tsx
│   ├── screens/                  # Screens composed of components
│   │   ├── Home/
│   │   │   ├── Card.tsx          # Component used only in Home
│   │   │   └── index.tsx         # Home screen
│   │   ├── Events.tsx            # Events screen
│   │   └── Settings.tsx          # Settings screen
│   ├── utils/                     # Reusable helper functions
│   └── hooks/                     # Custom React hooks
│       └── useTheme.ts
├── app.json                       # Expo config
├── eas.json                       # Expo EAS build config
└── package.json                   # Dependencies
Why did I choose this solution:
-
Pages are in
app/→ follows Expo Router rules for automatic routing -
Folders in
app/→ organize related pages together (stacks, tabs, etc.) -
/screens/folder → keeps page-specific components separate and organized -
Easy to maintain and scale → adding new pages or layouts is simple
-
Clear separation of concerns → components, hooks, utils, and assets are all in their own folders
3. Localization & Language Support
a. Multi-language database translation strategy
1. What solution did I choose?
-
-
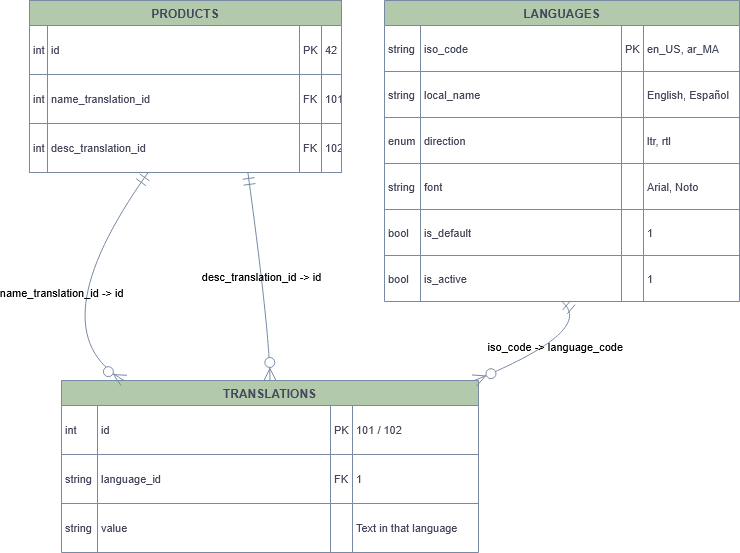
One-Table-Fits-All (global translation table):
-
2. why did I choose this solution:
- The main table only stores entity-specific data (
id,price, etc.). - Adding a new language doesn’t require schema changes.\
- Each translation can be reused by multiple products if needed (e.g.,
name_translation_id= 101 could be shared across entities — though usually IDs are unique per text). - Adding metadata like
font,direction, oris_activeis easy via thelanguagestable.
3. Cons
-
To fetch a product with translations, you need at least 2 joins
-
Large translations table (all entities’ text in all languages) can become huge
-
Requires proper indexing:
(id, language_code)and(language_code, value)for fast lookup -
Caching may be needed for high-traffic
-
Hard to maintain and Debug
4. Alternatives
1. Translation Table
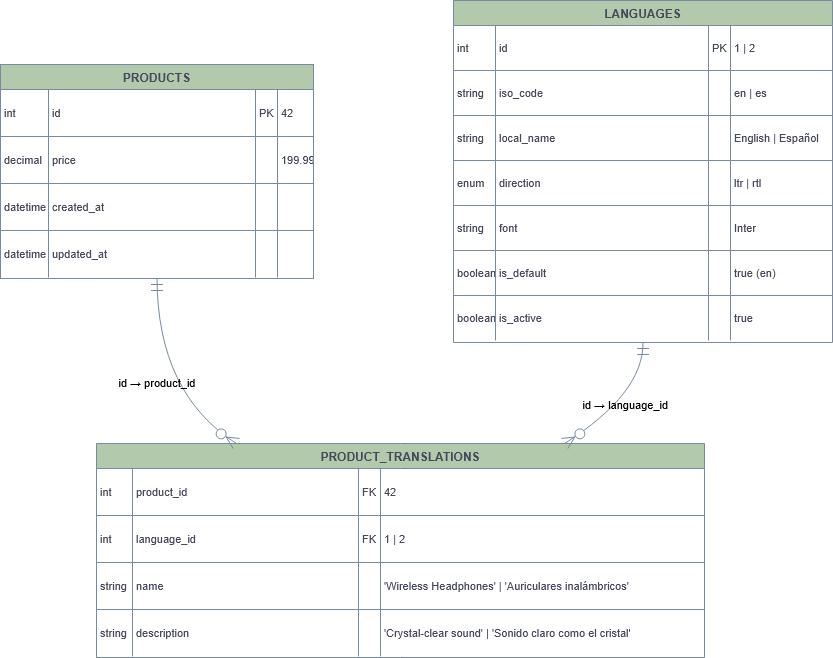
2. Pros:
-
Each entity has its own translation table (
product_translations) -
Easy to understand, manage and debug with for any developer
-
No magic IDs, no indirection
-
Very safe data model
-
One join only
3. Cons:
-
Schema Duplication: Every translatable entity needs its own table
-
Adding Fields Requires Schema Changes.
b. App language and RTL (Right-to-Left) support on web and mobile
What solution did we choose?
Mobile
-
react-i18nextfor translations -
expo-localizationto detect device language -
I18nManagerfor RTL handling -
NativeWindfor RTL-friendly styling
Web
-
next-intlfor internationalization -
Built-in RTL support using ShadCN UI and Radix UI
Why did I choose this solution?
4. Core Domain Logic
1. Qibla Calculation Logic
-
Purpose:
- Calculate the exact direction of the Kaaba from the user’s location
-
Technology Used:
- adhan-js
-
Why did I choose this option
- Adhan is a well tested and well documented library for calculating Islamic prayer times in JavaScript using Node or a web browser
- Provides Vriety of Calculation methods
- Have Other related solutions (Prayers Time Calculation, Sunnah Times)
-
Example:
var coordinates = new Coordinates(35.78056, -78.6389); var qiblaDirection = Qibla(coordinates); -
key formula
-
rotationNeeded = qiblaDirection - phoneHeading
-
2. Prayer Time Calculation Methods
-
Purpose
-
Calculate daily prayer times based on location and date.
-
-
Technology Used:
- adhan-js
-
Why did I choose this option
-
Multiple calculation methods
-
Different madhabs
-
High astronomical accuracy
- Support Manual Adjusments (adding for example 5 to each or specific prayer)
-
-
Prayer Time Calculation Methods
-
Muslim World League
Standard method used in many countries worldwide. -
Egyptian General Authority of Survey
Official method used in Egypt and some nearby regions. -
University of Islamic Sciences, Karachi
Commonly used in Pakistan, Bangladesh, and parts of India. -
Umm al-Qura University (Makkah)
Official method used in Saudi Arabia. -
Dubai
Method used in the UAE with regional time adjustments. -
Moonsighting Committee
Used mainly in North America, based on moon sighting criteria. -
North America (ISNA)
Standard method used by Islamic Society of North America. -
Kuwait
Method used by the Ministry of Awqaf in Kuwait. -
Qatar
Official method used in Qatar, similar to Umm al-Qura. -
Singapore
Method used in Southeast Asia with rounding rules. -
Tehran (Institute of Geophysics)
Method used in Iran with regional astronomical adjustments. -
Turkey (Diyanet)
Official Turkish religious authority method. -
Other / Custom
Allows manual configuration of calculation parameters.
-
-
Supported Madhabs
-
Shafi (Shafi‘i / Standard)
Used by the majority of Muslims worldwide
Asr starts when an object’s shadow is equal to its height -
Hanafi
Commonly used in South Asia and parts of the Middle East
Asr starts when an object’s shadow is twice its height
-
-
Examples:
-
Full Example
-
import {
  Coordinates,
  CalculationMethod,
  PrayerTimes,
  SunnahTimes,
  Prayer,
  Qibla,
} from 'adhan';
import moment from 'moment-timezone';

const coordinates = new Coordinates(35.7897507, -78.6912485);
const params = CalculationMethod.MoonsightingCommittee();
const date = new Date();
const prayerTimes = new PrayerTimes(coordinates, date, params);
const sunnahTimes = new SunnahTimes(prayerTimes);

moment(prayerTimes.fajr).tz('Africa/Casablanca').format('h:mm A');
-
- Prayer time date adjustment example:
-
const date = new Date(2015, 11, 1);
const params = CalculationMethod.MuslimWorldLeague();
params.madhab = Madhab.Shafi;
const p = new PrayerTimes(new Coordinates(35.775, -78.6336), date, params);
console.log(moment(p.fajr).tz('America/New_York').format('h:mm A')); # 5:35 AM
params.adjustments.fajr = 10;
const p2 = new PrayerTimes(new Coordinates(35.775, -78.6336), date, params);
console.log(moment(p2.fajr).tz('America/New_York').format('h:mm A')) # 5:45 AM
-
-
2. Hijri time caulculation methods
-
Purpose
-
Convert Gregorian dates to Hijri (Islamic) calendar.
-
-
Technology Used:
- Native Intl API
-
Why did I choose this option
-
-
Multiple calculation methods
- No external dependency
-
Good performance
-
Works on modern browsers and mobile
-
-
-
Hijri Calculation Methods
-
islamic-
Astronomical calculation (tabular-based)
-
Consistent and predictable
-
Common default in many environments
-
-
islamic-umalqura-
Based on Umm al-Qura calendar
-
Official calendar used in Saudi Arabia
-
Most accurate for KSA
-
-
islamic-tbla-
Tabular Islamic calendar
-
Fixed, arithmetic-based
-
Does not follow moon sighting
-
-
islamic-civil-
Civil Islamic calendar
-
Simplified tabular system
-
Used mainly for civil/statistical purposes
-
-
- Example:
-
const hijriDate = new Intl.DateTimeFormat(
  "ar-SA-u-ca-islamic",
  {
    day: "numeric",
    month: "long",
    year: "numeric",
  }
).format(new Date());

console.log(hijriDate);
-
6. Media Management
1. Audio resource handling (Sermon / موعظة)
-
What solution did I choose?
- AWS S3 for hosting all audio content
-
Why did I choose this solution?
-
-
AWS S3 for storing audio and video files
-
CloudFront CDN (content delivery network) for fast streaming and global delivery
- Already using it on our apps
- easy to test and debug with Minio S3
-
2. Video hosting and streaming strategy
-
What solution did I choose?
- YouTube for hosting all video content
-
Why did I choose this solution?
- Free and reliable hosting
- Automatic adaptive streaming for all devices
- Handles all video encoding, formats, and resolutions
- Easy embedding in web/mobile apps
- Already implemented with Maraqi
-
Example from maraqi
-
Alternatives
- Vimeo
- AWS S3

6. Notifications & Communication
1. Scheduling notificaiton
-
Purpose
-
Keep users engaged and informed for prayer times, acts...
-
Deliver timely updates (push notifications, emails)
-
Support daily schedules, prayer reminders, or app events
-
Ensure notifications are reliable, even if the app crashes
-
-
What solution did I choose?
-
Technologies
-
NestJS Cron – scheduling jobs
-
BullMQ (Redis-based queue) – delayed job processing
-
Expo Push Notifications / FCM / APNs – mobile notifications
-
Nodemailer / Email providers – email notifications
-
moment-timezone timezone library for user timezone handling
-
-
Implementation:
-
NestJS Cron runs every midnight
-
Cron creates a BullMQ queue for only that day’s notifications and based on the user timezone
-
Each notification in the queue has a delay for its scheduled time
-
-
-
Why did I choose this solution?
-
Avoid running a heavy cron every minute
-
Node.js event loop cannot handle large number of delayed notifications directly
-
Using BullMQ queues allows:
-
Reliable scheduling
-
Retry mechanisms
-
Scalable background processing
-
-
-
Logic Summary
-
At midnight, the cron job collects all notifications for the current day
-
Pushes them into a BullMQ queue with their scheduled delay based on user timezone
-
Worker processes the queue and sends the notification at the correct time
-
-
Technical Challenges
-
Handling large volume of notifications without blocking Node event loop
-
Ensuring notifications are sent even if the app or server restarts
-
Avoiding expensive cron runs every minute/hour
-
Synchronizing user timezones for delivery
-
2. Timezone-Aware Push Notification System
-
Purpose
-
Ensure notifications are delivered at the correct local time for each user
-
Support global users in different timezones
-
Maintain reliability and accuracy for time-sensitive events
-
-
What solution did I choose?
-
-
Moment-timezone – convert timezone to user local time
-
Geo-TZ – get timezone from latitude/longitude
-
BullMQ – queue and schedule delayed notifications
-
-
-
Why did I choose this solution
-
Users may be in different timezones, so server time alone isn’t enough
-
Moment-timezone allows precise conversion of UTC times to user local time
-
Combined with BullMQ, notifications fire at correct local time without blocking server
-
- Implementation Example:
-
import * as moment from 'moment-timezone';
import { find } from 'geo-tz';

const latitude = 34.020882;
const longitude = -6.841650;

// Determine user's timezone from coordinates
const timezones = find(latitude, longitude);
const timezone = timezones[0] || 'UTC';

// Example: convert a UTC time to user's local time
const utcTime = new Date('2026-01-02T12:00:00Z');
const localTime = moment(utcTime).tz(timezone).format('HH:mm');

console.log(`Notification should fire at local time: ${localTime}`);
-
3. Email notification
-
What solution did I choose
-
NestJS MailerModule integrated with Mailgun API
-
Emails are sent through Mailgun’s transactional service
-
-
Technologies
-
@nestjs-modules/mailer – NestJS module for sending emails
-
Mailgun – Transactional email service with API/SMTP integration
-
Handlebars – for dynamic email templates
-
BullMQ – for queueing scheduled emails
-
-
Why did I choose this solution?
-
Mailgun is Well known and used
-
NestJS Mailer is well-integrated with the framework
-
Easy to use templates for personalized content
-
Works seamlessly with queues for delayed or scheduled emails
-
7. Application Standards
1. Authentication and Authorization
-
What solution did I choose
-
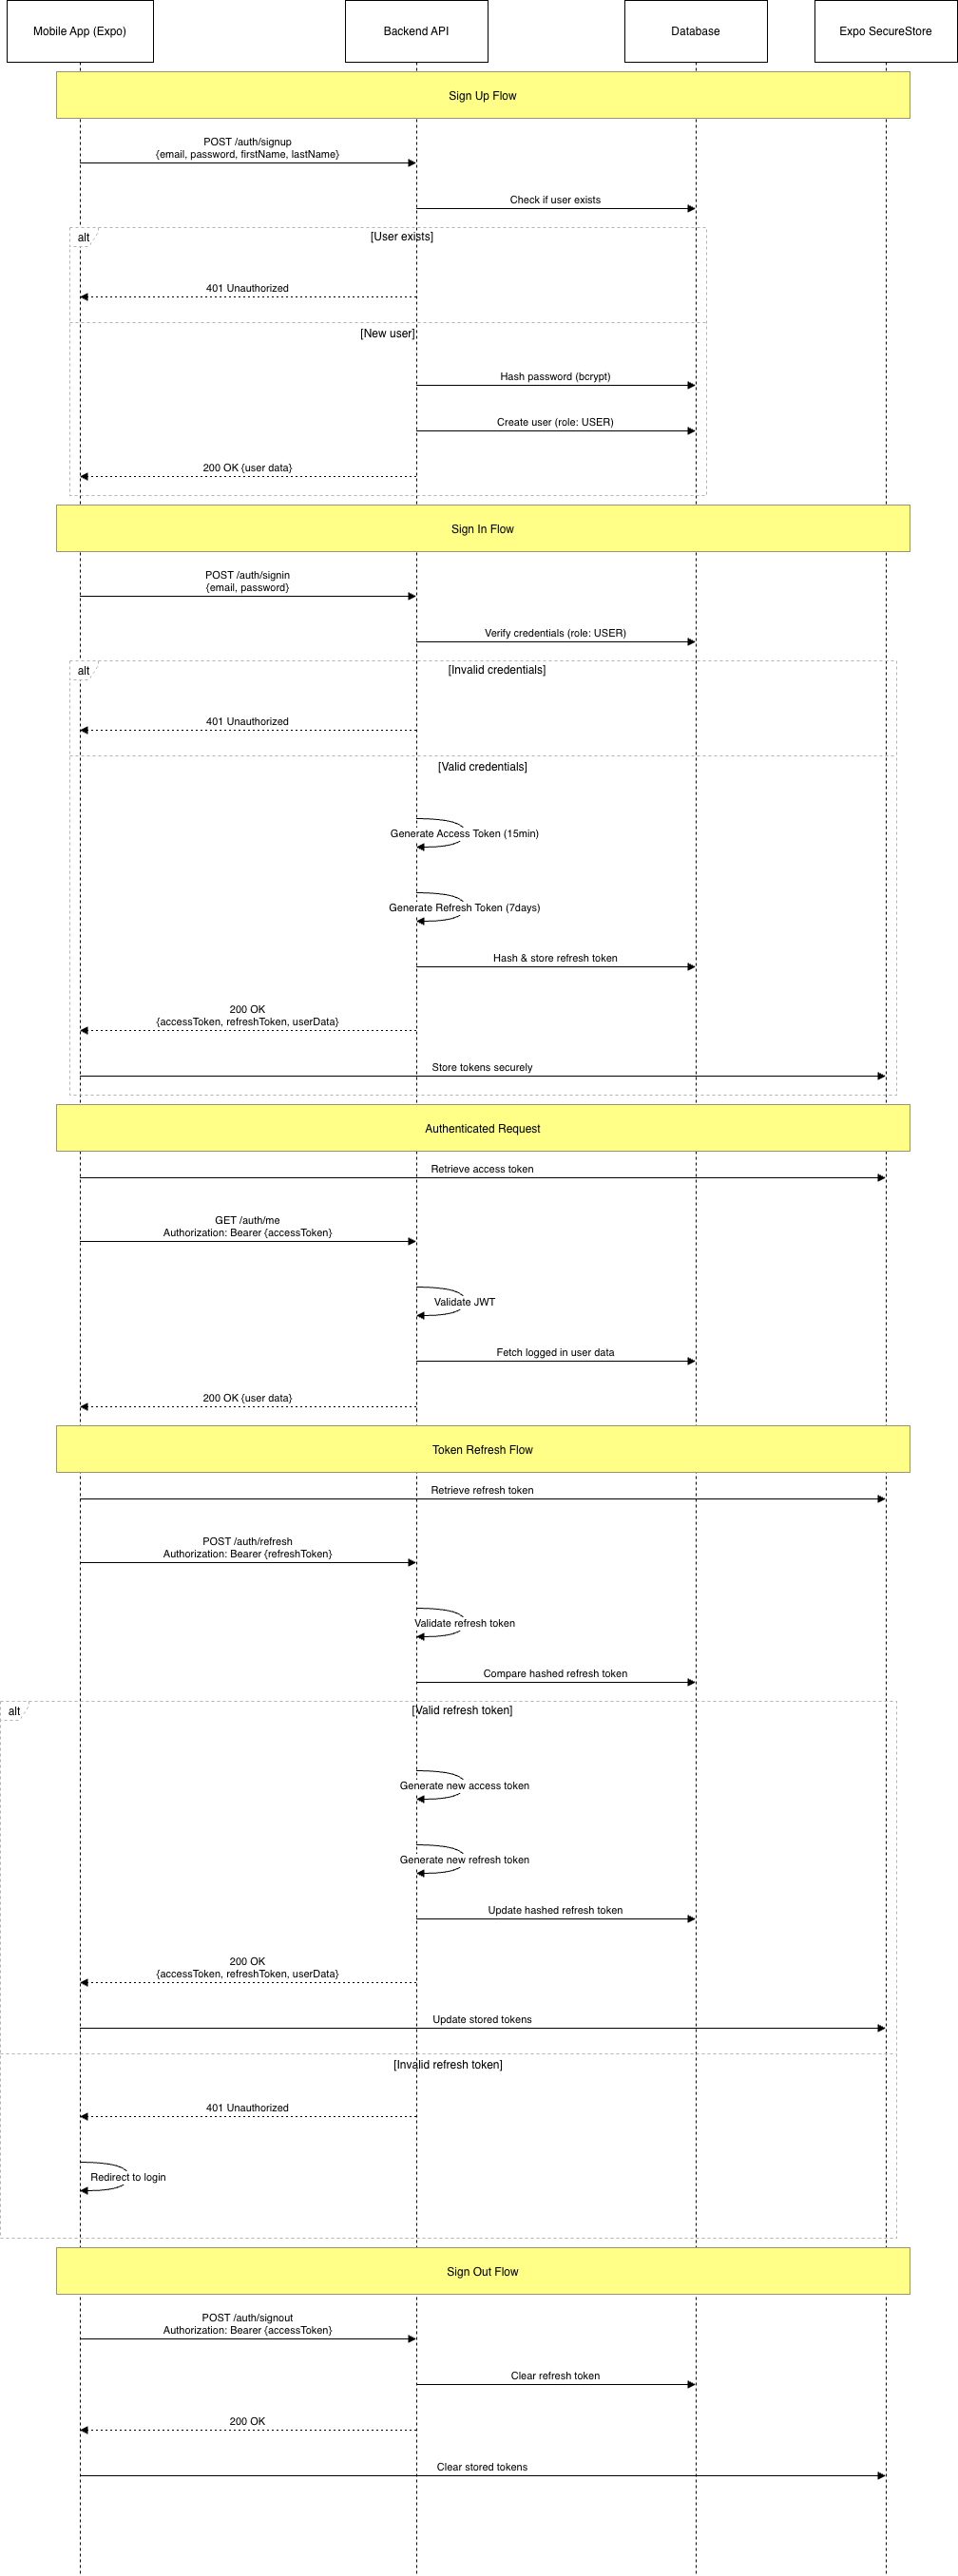
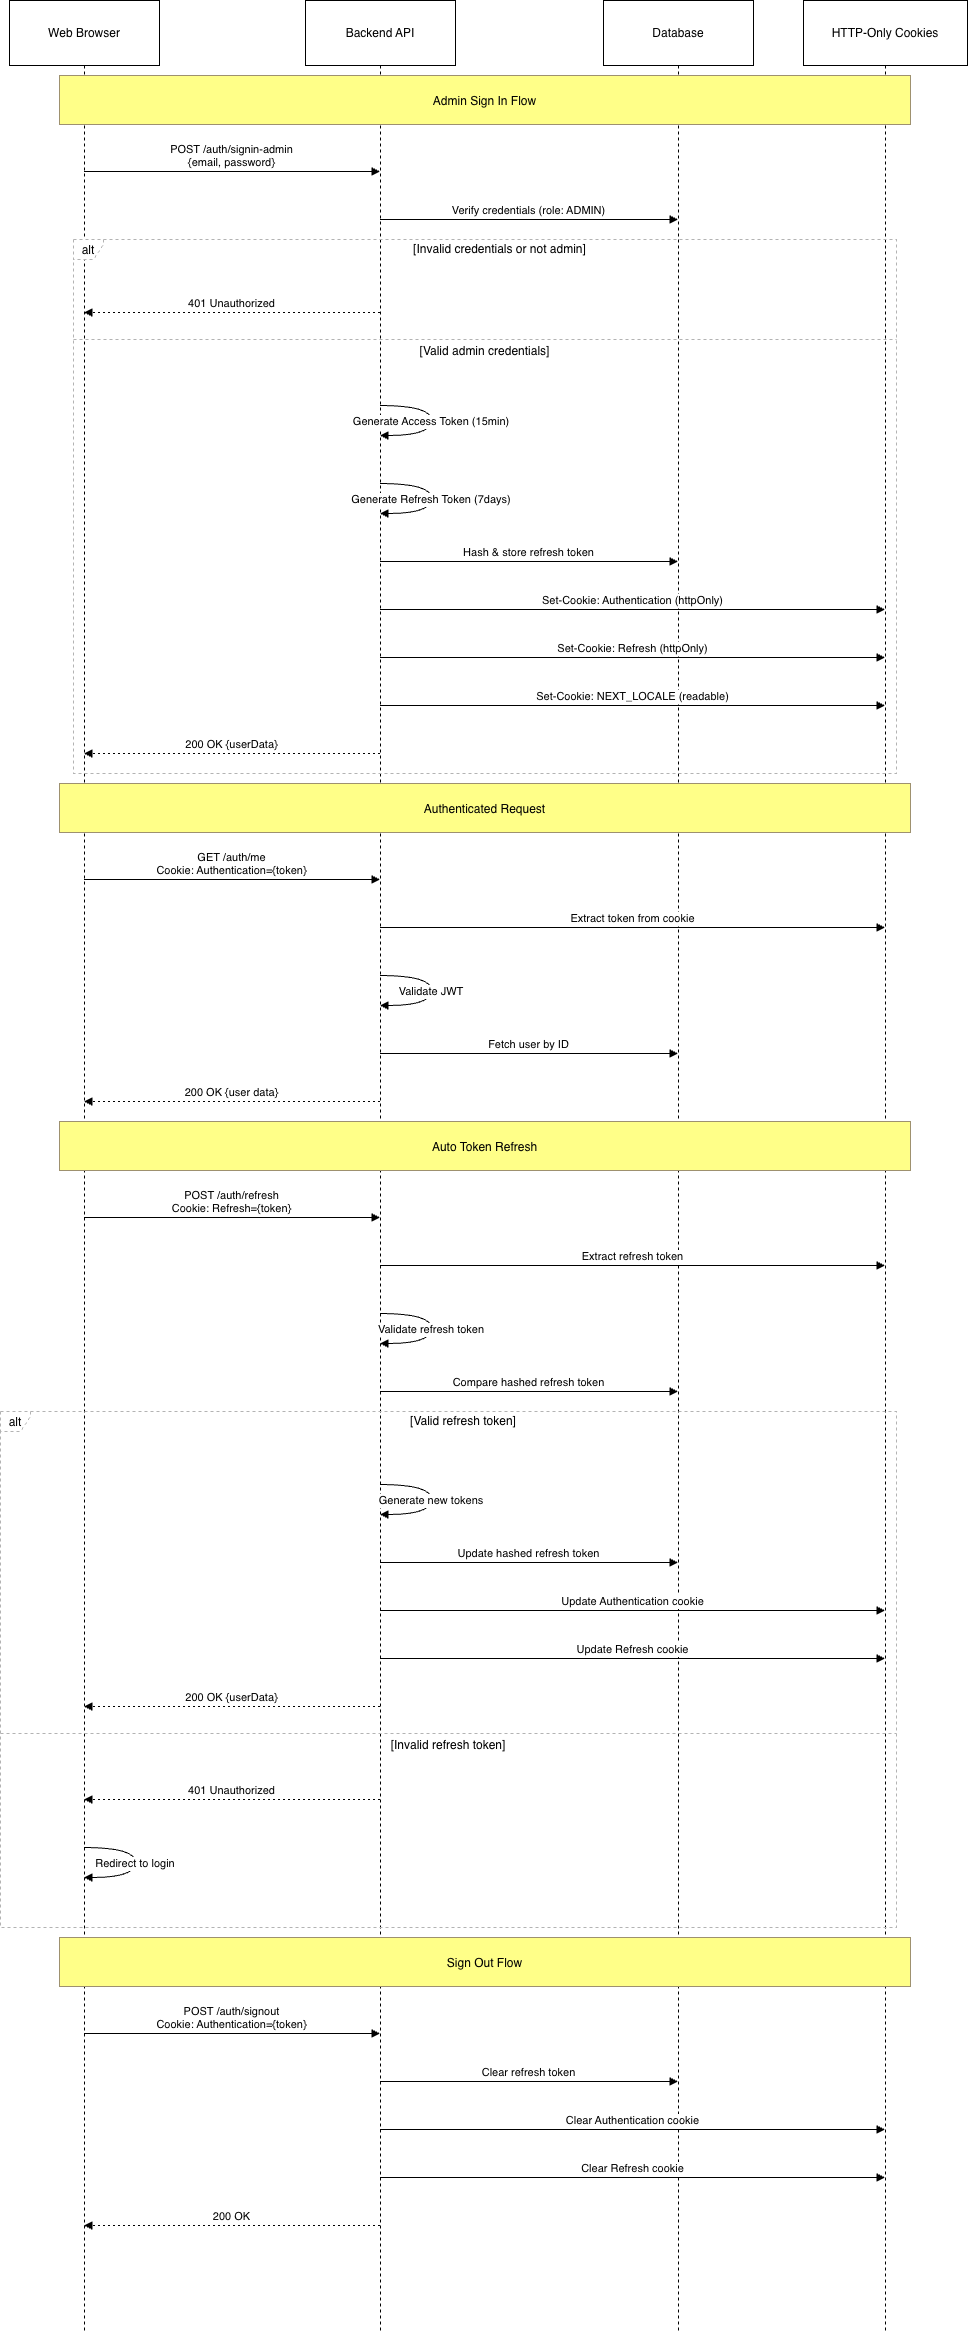
We chose a Passport.js–based authentication system using:
-
Local strategy for login
-
JWT access and refresh tokens
-
Separated strategies per user type (normal user / admin)
-
Different token storage strategies for web and mobile
- RBAC for access control
-
-
Technologies
-
Passport.js (NestJS integration)
-
JWT (Access & Refresh Tokens)
-
bcrypt (password and refresh token hashing)
-
HTTP-only cookies (Web)
-
Expo Secure Store (Mobile)
-
-
-
Why did I choose this solution?
-
Password Hashing: Bcrypt with 10 salt rounds
-
Refresh Token Hashing: Stored as bcrypt hash in database
-
HTTP-Only Cookies (Web): Prevents XSS attacks
-
Secure Cookies: Enabled in production
- Crypted Storage (Mobile):
expo-secure-storeprovides a way to encrypt and securely store key-value pairs locally on the device -
Token Rotation: New refresh token on each refresh
-
Single Session: Old refresh token invalidated on new login
- RBAC: manages user access to systems
-
-
Breaking down the Authentication and Authorization design system
-
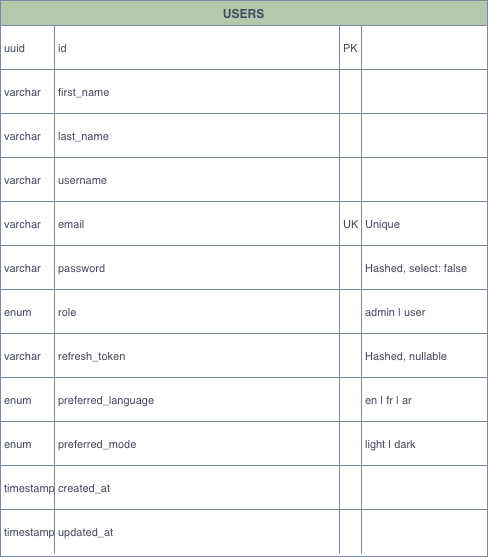
- User database design:
-
- Mobile Authentication and Authorization Flow
- User database design:
-
Web Authentication and Authorization Flow
-
-
Role-Based Access Control (RBAC)
-
-
Roles
-
enum Role {
ADMIN = 'admin',
USER = 'user'
}-
-
Implementation
-
-
-
-
@Roles()Decorator: Define required roles for endpoints -
RolesGuard: Validates user has required role -
@Public()Decorator: Bypass authentication for public routes
-
-
-
-
Example Usage
-
@Roles(Role.ADMIN)
@Get('admin-only')
adminOnlyEndpoint() {
// Only accessible by admins
}
2. Request logging
-
Purpose
Track incoming requests and application behavior for debugging, monitoring, and auditing across backend services
-
What solution did I choose
- We chose nestjs-pino Logger plus AWS as the primary logging solution, with pino-pretty enabled in development mode for readable logs
-
How It Works
-
All HTTP requests are automatically logged
-
Logs include:
-
HTTP method
-
URL
-
Status code
-
Response time
- Request Body
- Request query
- Request params
- Ip address
- User logged in for authenticated requests
- App logs
- User agent
- Platform
-
-
In development:
-
Logs are formatted using
pino-pretty
-
-
In production:
-
Logs remain structured JSON for log aggregation tools
-
-
-
Why did I choose this solution?
-
-
Well-integrated with NestJS through the
nestjs-pinopackage -
Simple and and have huge logging configuration
-
Produces structured JSON logs for production environments
-
Provides human-readable logs during development
-
-
-
Alternatives
- Winston
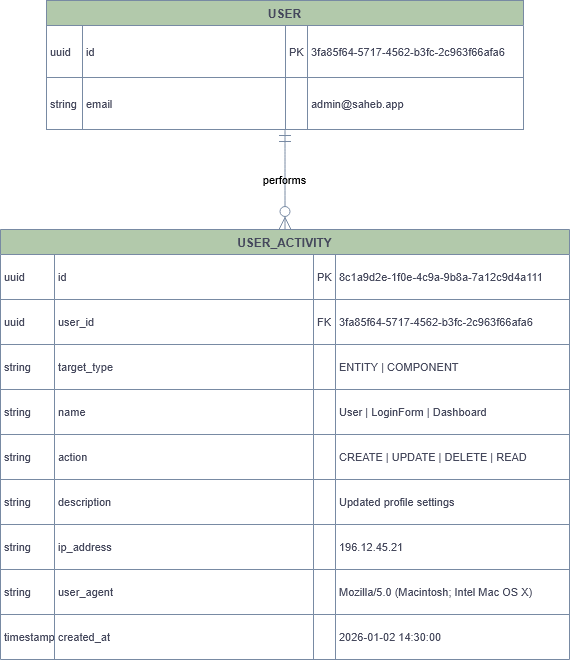
3. User event and activity tracking
-
Purpose
-
Track important user actions across the application for:
-
Auditing
-
Debugging
-
Analytics
-
Security monitoring
-
-
-
What solution did I choose?
We chose a database-driven user activity tracking system, implemented using:
-
A dedicated
user_activitiestable -
TypeORM entity event listeners to capture actions automatically
-
-
Why did I choose this solution?
I chose this approach because:
-
It provides a centralized and consistent way to track user actions
- Some events relate to UI components, not entities
-
It avoids polluting controllers and services with logging logic
-
It is easy to extend as the system grows
-
It works uniformly for web and mobile clients
-
It is suitable for auditing, debugging, and analytics use cases
-
-
How does it work?
-
Important entities and actions are observed using TypeORM subscribers
-
When an action occurs (
CREATE,UPDATE,DELETE) -
The system records:
-
Who did the action (
user_id) -
What was affected (
name→ entity or component name) -
The type of action (
action) -
Optional description
-
-
A row is saved in the
user_activitiestable
-
-
Database Design System
-
-
Typeorm Subscriber
-
@Injectable()
@EventSubscriber()
export class ActivitySubscriber implements EntitySubscriberInterface {
  private excludedEntities = [
    UserActivity.name, // avoid recursive logging
  ];

  constructor(
    @Inject(DataSource) dataSource: DataSource,
    private readonly cls: ClsService,
    private readonly activityService: ActivityService,
  ) {
    dataSource.subscribers.push(this);
  }

  private get user() {
    return this.cls.get('user');
  }

  private get requestInfo() {
    return this.cls.get('requestInfo');
  }

  async afterInsert(event: InsertEvent<any>) {
    await this.log(event, 'CREATE');
  }

  async afterUpdate(event: UpdateEvent<any>) {
    await this.log(event, 'UPDATE');
  }

  async afterRemove(event: RemoveEvent<any>) {
    await this.log(event, 'DELETE');
  }

  private async log(
    event: InsertEvent<any> | UpdateEvent<any> | RemoveEvent<any>,
    action: ActivityAction,
  ) {
    const entityName = event.metadata.targetName;

    if (this.excludedEntities.includes(entityName)) return;

    await this.activityService.create({
      user_id: this.user?.id ?? null,
      target_type: 'ENTITY',
      name: entityName,
      action,
      description: null,
      ip_address: this.requestInfo?.ip,
      user_agent: this.requestInfo?.userAgent,
    });
  }
}
-
3. API Versioning
-
Technologies
- NestJS built-in versioning
-
What Solution did I choose?
- I choose route-based API versioning with NestJS. The default version is
1, and it’s applied in the URI.
- I choose route-based API versioning with NestJS. The default version is
-
Why did I choose this solution?
-
Simple and clear for clients to see which API version they are using.
-
Works well with RESTful routes and web/mobile clients.
-
Easy to maintain multiple versions simultaneously.
- Used widely
-
-
How it works
-
import { VersioningType } from '@nestjs/common'; import { NestFactory } from '@nestjs/core'; import { AppModule } from './app.module'; async function bootstrap() { const app = await NestFactory.create(AppModule); // Enable route-based versioning app.enableVersioning({ type: VersioningType.URI, defaultVersion: '1', }); await app.listen(3000); } bootstrap(); - With this, routes will look like:
-
/v1/auth/signin
/v1/users/me
/v2/auth/signin   // future version
-
-
-
Alternative Approaches
-
Header-based versioning (
Acceptheader) -
Media type versioning (
application/vnd.app.v1+json) -
Query parameter versioning (
?v=1)
-
4 .File Upload handling
-
What solution did I choose?
- I choose direct upload using presigned Urls to AWS S3 using the AWS SDK with NestJS for large files (e.g., app videos uploaded via the web). For small files (e.g., user profile pictures), I use Multer to handle uploads on the server.
-
Why did I choose this solution?
-
Large files: Direct S3 upload avoids overloading the server, bypasses Node.js memory limits, and allows faster uploads.
-
Small files: Multer is simple and works well for small files where server processing or validation might be needed.
-
5. Data Validation
-
What solution did I choose?
- I choose NestJS ValidationPipe together with class-validator and class-transformer, using DTOs for all CRUD actions.
-
Why did I choose this solution?
-
Ensures that all incoming requests are properly validated before hitting the service layer.
-
Works seamlessly with TypeScript and DTOs, keeping backend code clean and safe.
-
Supports automatic data transformation (e.g., string to number) via
class-transformer. - It uses Nestjs Best practices
-
-
How it works
- Create DTOs for each action (e.g.,
CreateUserDto,UpdateUserDto,GetUserDto) with decorators fromclass-validator. - Apply the
ValidationPipeglobally or per-route with options-
import { ValidationPipe } from '@nestjs/common';

app.useGlobalPipes(
  new ValidationPipe({
    transform: true,         // Automatically transform payload to DTO class instances
    whitelist: true,         // Strip properties that are not in the DTO
    forbidNonWhitelisted: true, // Throw an error if extra properties are present
    forbidUnknownValues: true,  // Ensure only known types are allowed
  }),
);
-
- Create DTOs for each action (e.g.,
-
cURL Example: ValidationPipe rejecting extra property
-
import { IsEmail, IsNotEmpty, MinLength } from 'class-validator'; export class CreateUserDto { @IsNotEmpty() firstName: string; @IsNotEmpty() lastName: string; @IsEmail() email: string; @MinLength(6) password: string; } - If someone tries to inject an extra field
role:-
curl -X POST http://localhost:3000/auth/signup \
  -H "Content-Type: application/json" \
  -d '{
    "firstName": "John",
    "lastName": "Doe",
    "email": "john@example.com",
    "password": "123456",
    "role": "ADMIN"
  }'
-
- Response:
-
{
  "statusCode": 400,
  "message": [
    "property role should not exist"
  ],
  "error": "Bad Request"
}
-
-
Summary